Can you use Free Software editors for more than applying a pretty effects and adding an Adele song to your video of your holidays in Ibiza? We saw that Kdenlive could, and in this tutorial you’ll see that Natron is even better at creating complex. professional-looking shots.
To try and prove my point that GNU/Linux and the Free Software users already have the tools that professional videographers need for their everyday work, I posed myself the following challenge: using three widely available FLOSS apps (I picked Kdenlive, Natron and Blender), I had to create on each a 20-second, one-shot video, showing a static or animated background with three “windows”, each of which played a different movie, something like what you can see below.
![The challenge: Create a video of a static or moving background (the technique should allow both) with three windows, each showing a different movie playing within them. You can only use Free Software apps that work on a free OS. The videos I chose also happen to be free, by the way -- from left to right, Blender Foundation's Big Buck Bunny [https://peach.blender.org/], Sintel [https://durian.blender.org/], and Tears of Steel [https://mango.blender.org/].](http://www.ocsmag.com/wp-content/uploads/2016/01/fig01_template.png)
The challenge: Create a video of a static or moving background (the technique should allow both) with three windows, each showing a different movie playing within them. You can only use Free Software apps that work on a free OS. The videos I chose also happen to be free, by the way — from left to right, Blender Foundation’s Big Buck Bunny, Sintel, and Tears of Steel.
Previously, on OCSMag…
In the first article of this series, I mostly used Kdenlive. Since I published it, many readers have pointed out ways to complete the challenge better, thus proving that if you are looking for answers on the Internet, you shouldn’t post a question, you should post something that is wrong. Below, for example, is Brian Cluff’s solution to the Challenge:
No sarcasm intended, since I actually think this is pretty great: this crowdsourced “patching” of my original solution (which worked but wasn’t optimum) helps compensate for Kdenlive’s poor documentation situation. Thank you everybody.
Natron
I started with Kdenlive because it seemed more intuitive, but Natron isn’t that hard once you get the hang of it. To do that, you have to understand that Natron is fundamentally different from Kdenlive and similar apps. In Natron, for starters, there is no audio editing. This is a pure video app, and that’s fine; in fact it is kind of refreshing, since it harks back to the do-one-thing-and-do-it-well of the Unix philosophy of yore.
Another thing is that Natron is not exactly a “movie editor” at all. You can’t use it to cut and paste shots together to create a whole film. It is more of a “shot editor”. Your workflow would be to create the shots in Natron and then glue them together with transitions in the likes of Kdenlive, which is a movie editor.
Finally, Natron uses nodes to pile effects and modifiers on to your clips. The default effects/nodes are like primitives and, by combining different nodes, changing their order and parameters, and using their outputs to affect other nodes, the possibilities are nearly endless.
Let’s see how all this works in practice by tackling the challenge described above.
Solving the Challenge
Get the Clips!
If you want to follow along, you can grab the clips, background image and masks from the OCSMag Google Drive. Although you can download Big Buck Bunny, Sintel, and Tears of Steel from the Blender Foundation’s sites, we have cut out 20-second clips from each especially chosen to fit the tasks below.
Big Buck Bunny, Sintel, and Tears of Steel, all their assets (music, artwork, models, and son), and all derivative works (such as the clips used in this tutorial) are distributed under the Creative Commons Attribution 3.0 license.
The default Natron layout looks like what you can see below. At the top on the left is the preview pane (1) which shows the output from viewer nodes — note the plural. There can be more than one viewer node, and, as you add more and more of them, tabs get added across the top of the pane so you can easily switch from viewer output to viewer output.
On the right is the node property stack (2). Each node has a box containing its own properties and parameters. You can modify each property to make the node do different things or to apply an animation to an effect.
Finally, in the bottom left you have the Node Graph pane (3). This is where you build up your clip, adding nodes and interconnecting them with your sources and the output.
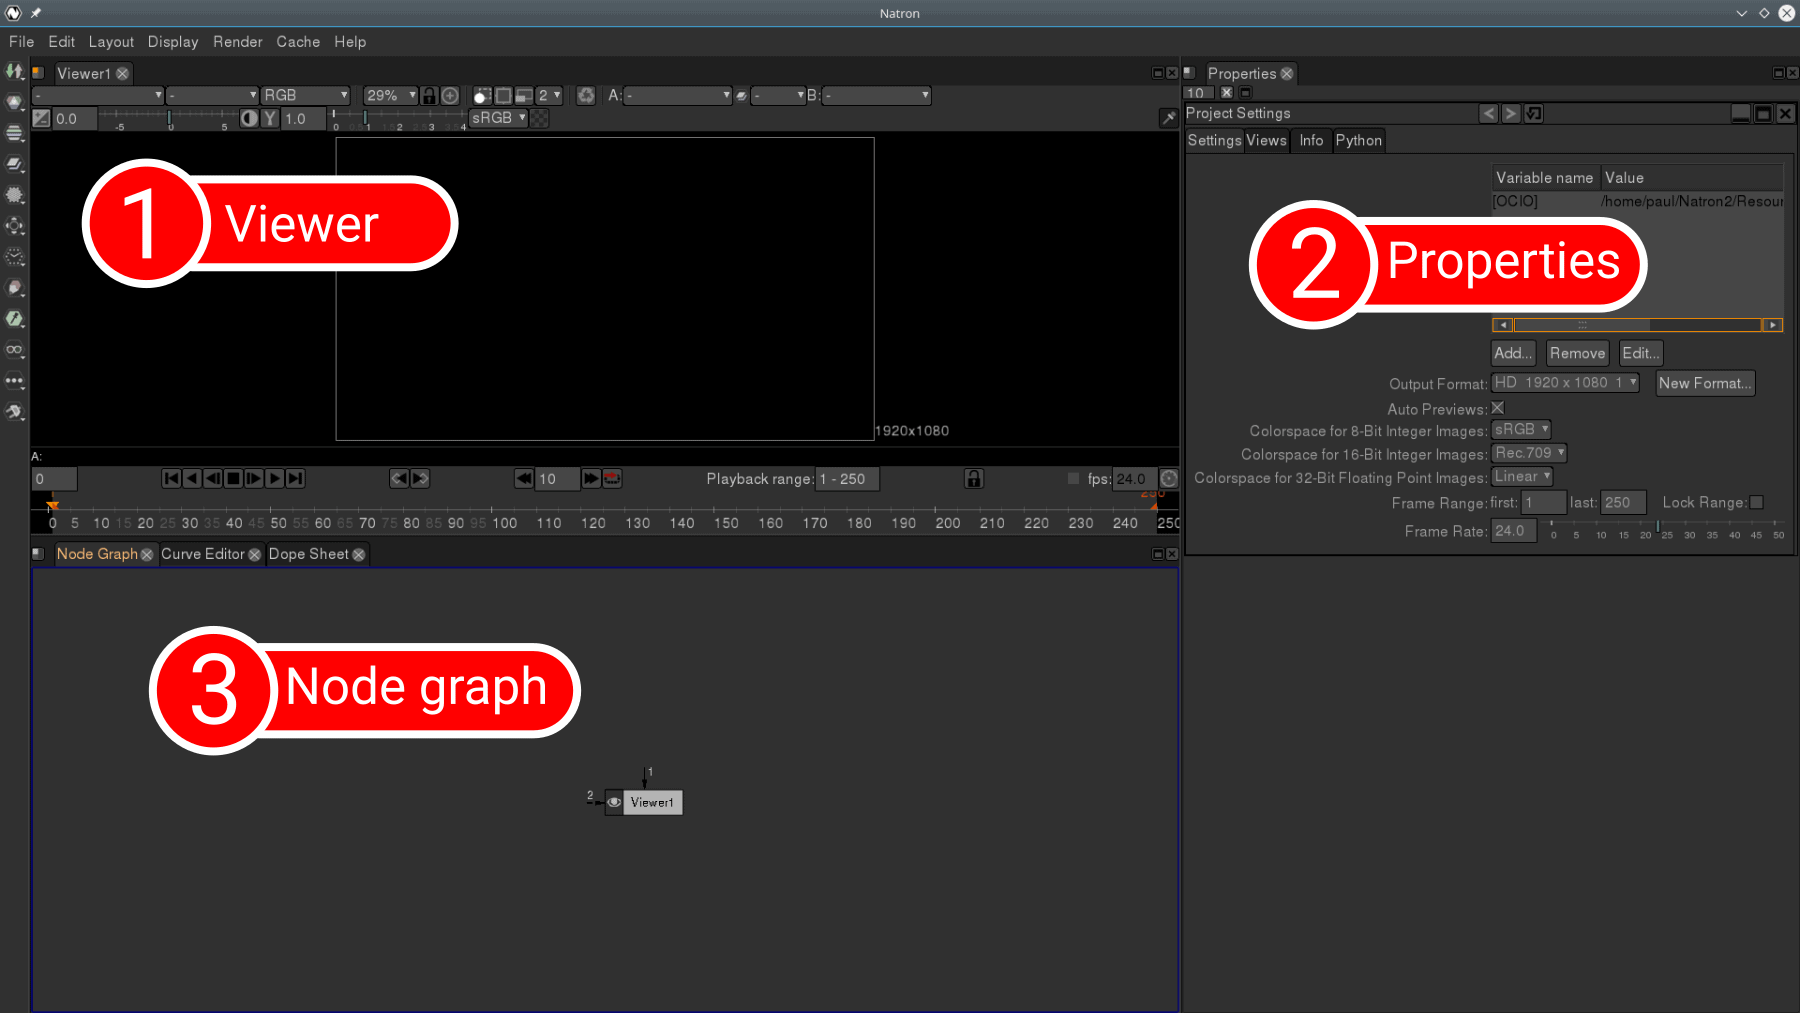
Natron’s default layout: (1) Top left, viewer preview pane; (2) right, node properties; (3) bottom left, node graph.
And that’s where you start: You can bring in the background image (blender_bg.png) by dragging and dropping it into the Node Graph pane from your file browser, or you can right click in the pane and pick a Read node (right click > Image > Read). This will automatically open a file browser and you can navigate to the file you want to import.
Once you chose the picture or clip you need, a node containing a preview will appear in the node graph. On the bottom edge, you’ll notice a little arrow head protruding and pointing down. Click and drag the arrowhead, pulling the arrow head onto the viewer node, as shown below.
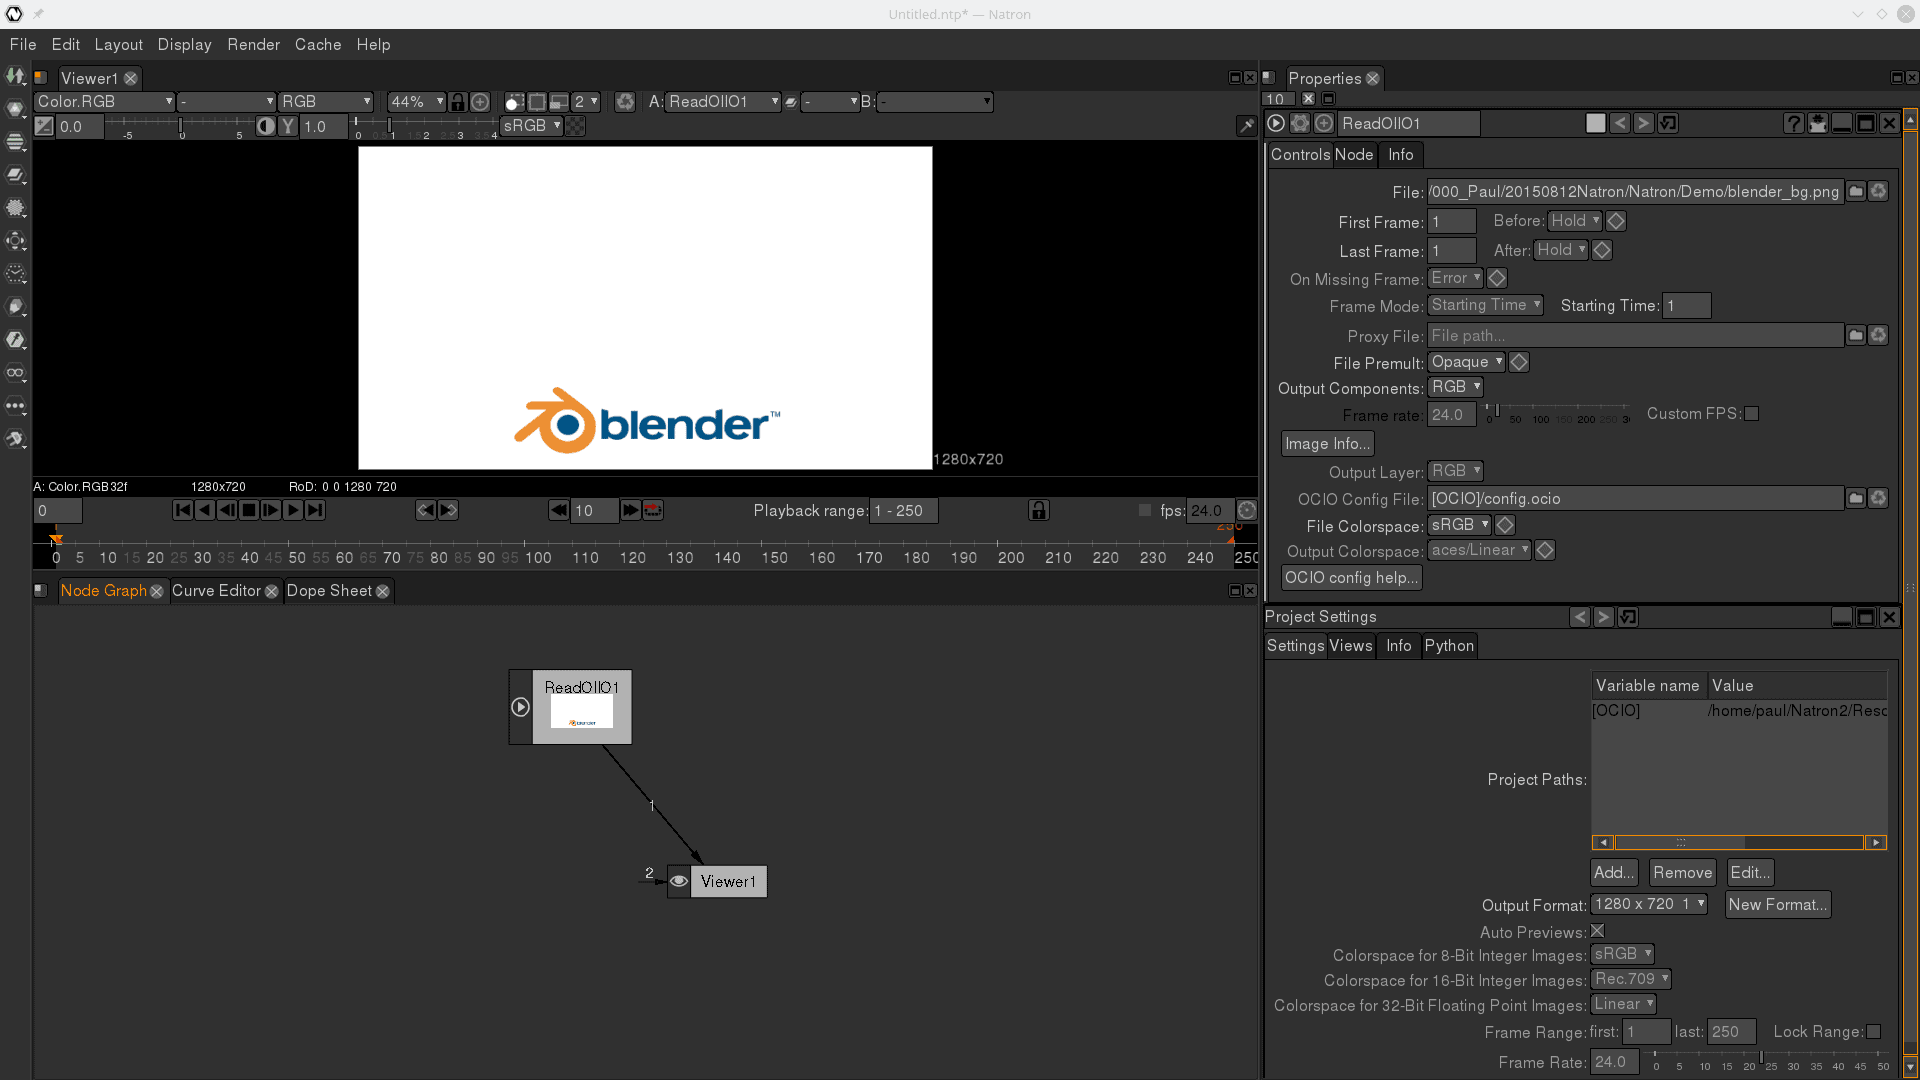
You connect two nodes by pulling arrows from one node to another.
Hey Presto! You’ve made your first connection. The preview will also now show the image or clip.
Notice that on the right you now have a new node property box with the name of the new node at the top. While working with nodes, you can scroll up and down the list of boxes until you find the one you want to tweak, or you can bring up the one you’re interested in by double clicking on the node in the Node Graph pane.
Your new node is probably called ReadOIIO1 or something like that. You can change that to something easier to remember, for example, background, by typing a new name into the text field at the top of the property box. The label at the top of the node in the Node Graph will also change. This is useful to make nodes easier to identify when you are working with a lot of them.
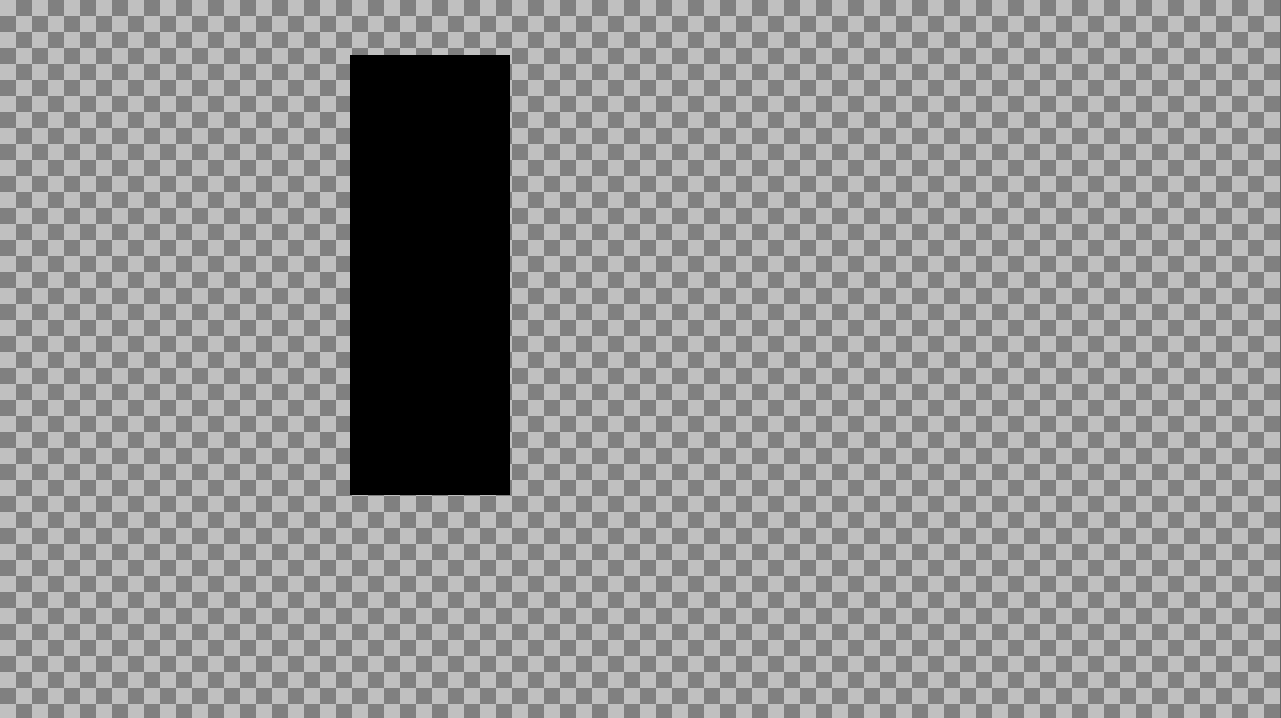
The mask for Big Buck Bunny.
Bring in your first movie clip the same way you did with the background, i.e. by dragging and dropping from your file browser, or right clicking in the pane and using Image > Read. If you’re using the files we provide, pick the 20-second Big Buck Bunny clip (clip_BBB_20sec_2.mp4) and, as before, rename the node to make it more easily identifiable.
Before connecting everything together, look at the Big Buck Bunny node properties and check the Frame rate. It should be 25 FPS. However, Natron has given the background a frame rate of 24 FPS. You should change that so all clips have the same FPS, otherwise Natron will complain later on.
To change the background’s FPS, double click on your background node in the Node Graph and its properties will show up at the top in the properties stack on the right. You may notice that the Frame rate option is greyed out. Click in the Custom FPS box to unblock it, and type 25.0 into the Frame rate box.
Next we need to bring in a mask. For Big Buck Bunny, the mask is a PNG with a transparent (alpha) background containing a plain, opaque rectangle placed on the left of the frame (mask01.png) — see above.
You will have to adjust the FPS for the mask the same way you did for the background node. You can also give the node a more descriptive name. I called mine mask 1.
To mix the three inputs together you’re going to need a merge node. Right click in the Node Graph and pick Merge > Merge > In. This will create a blue merge node on you workspace. The merge node can take basically 3 inputs:
- A is the node which goes on the top layer
- B is the node which will go at the bottom
- Mask is a shape that can be used to cut a chunk out of A.
You can add more inputs to the merge. As you add layers, the merge node gives you an A2 input, then an A3, then an A4, etc. Each layer will be place above the preceding one, so A4 will be on top of (and occlude) A3; A3 will be on top of A2; and so on. As you can adjust the colour and alpha channels of each layer, plus a slew of other features, this allows you to make very sophisticated composites at each merge node.
But, for this exercise, you just need the A, B and Mask inputs. Disconnect the background node from the viewer. The preview will turn black. Next connect the bottom arrow of the merge node to the viewer node.
Connect the B arrow from the merge node with the background node and the background image will show up in the preview pane again. Now connect A with the video node (Big Buck Bunny) and the background disappears from the viewer, covered by the video. Don’t panic. Next connect the merge node mask arrow with your mask node. You should end up with something like this:
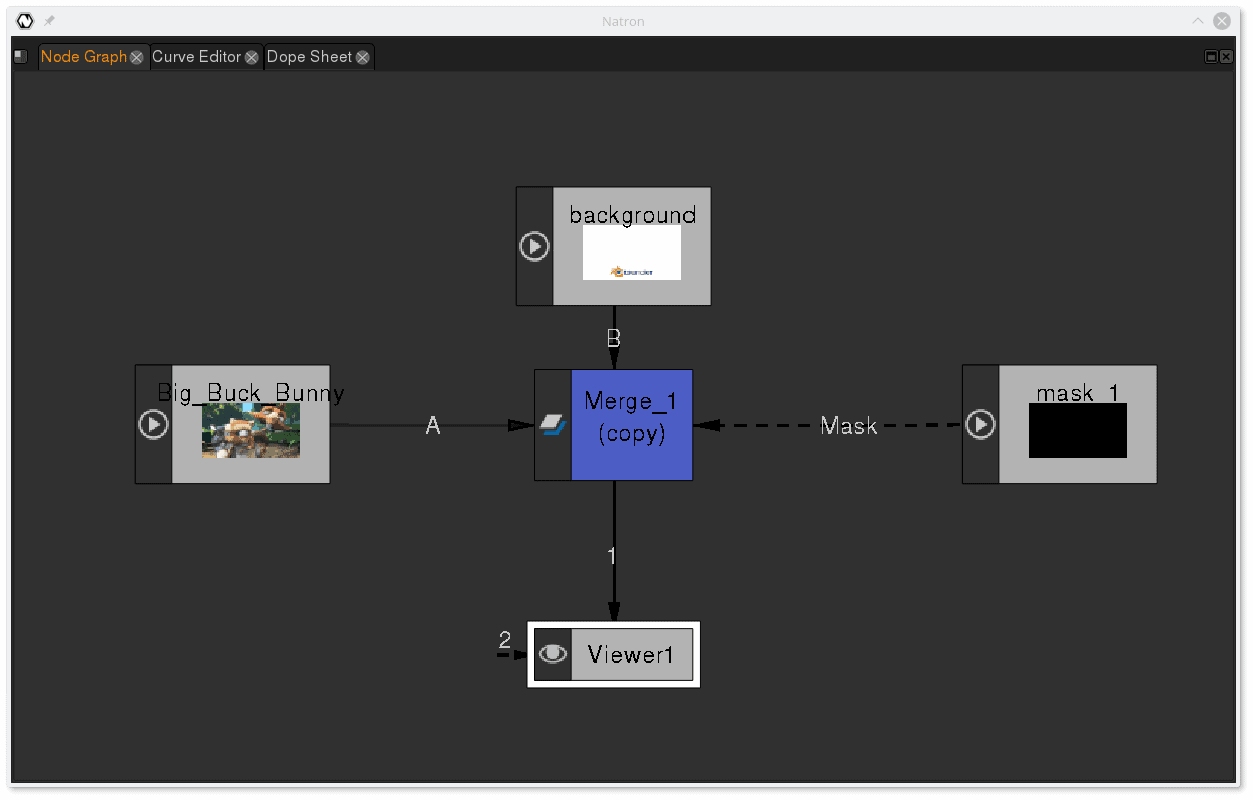
This is how you apply a mask in Natron.
Notice how I changed the merging operation to copy in the merge node’s property box. You can do the same or leave the node as in. For this example, it makes no difference.
The resulting output in the viewer will look like this:
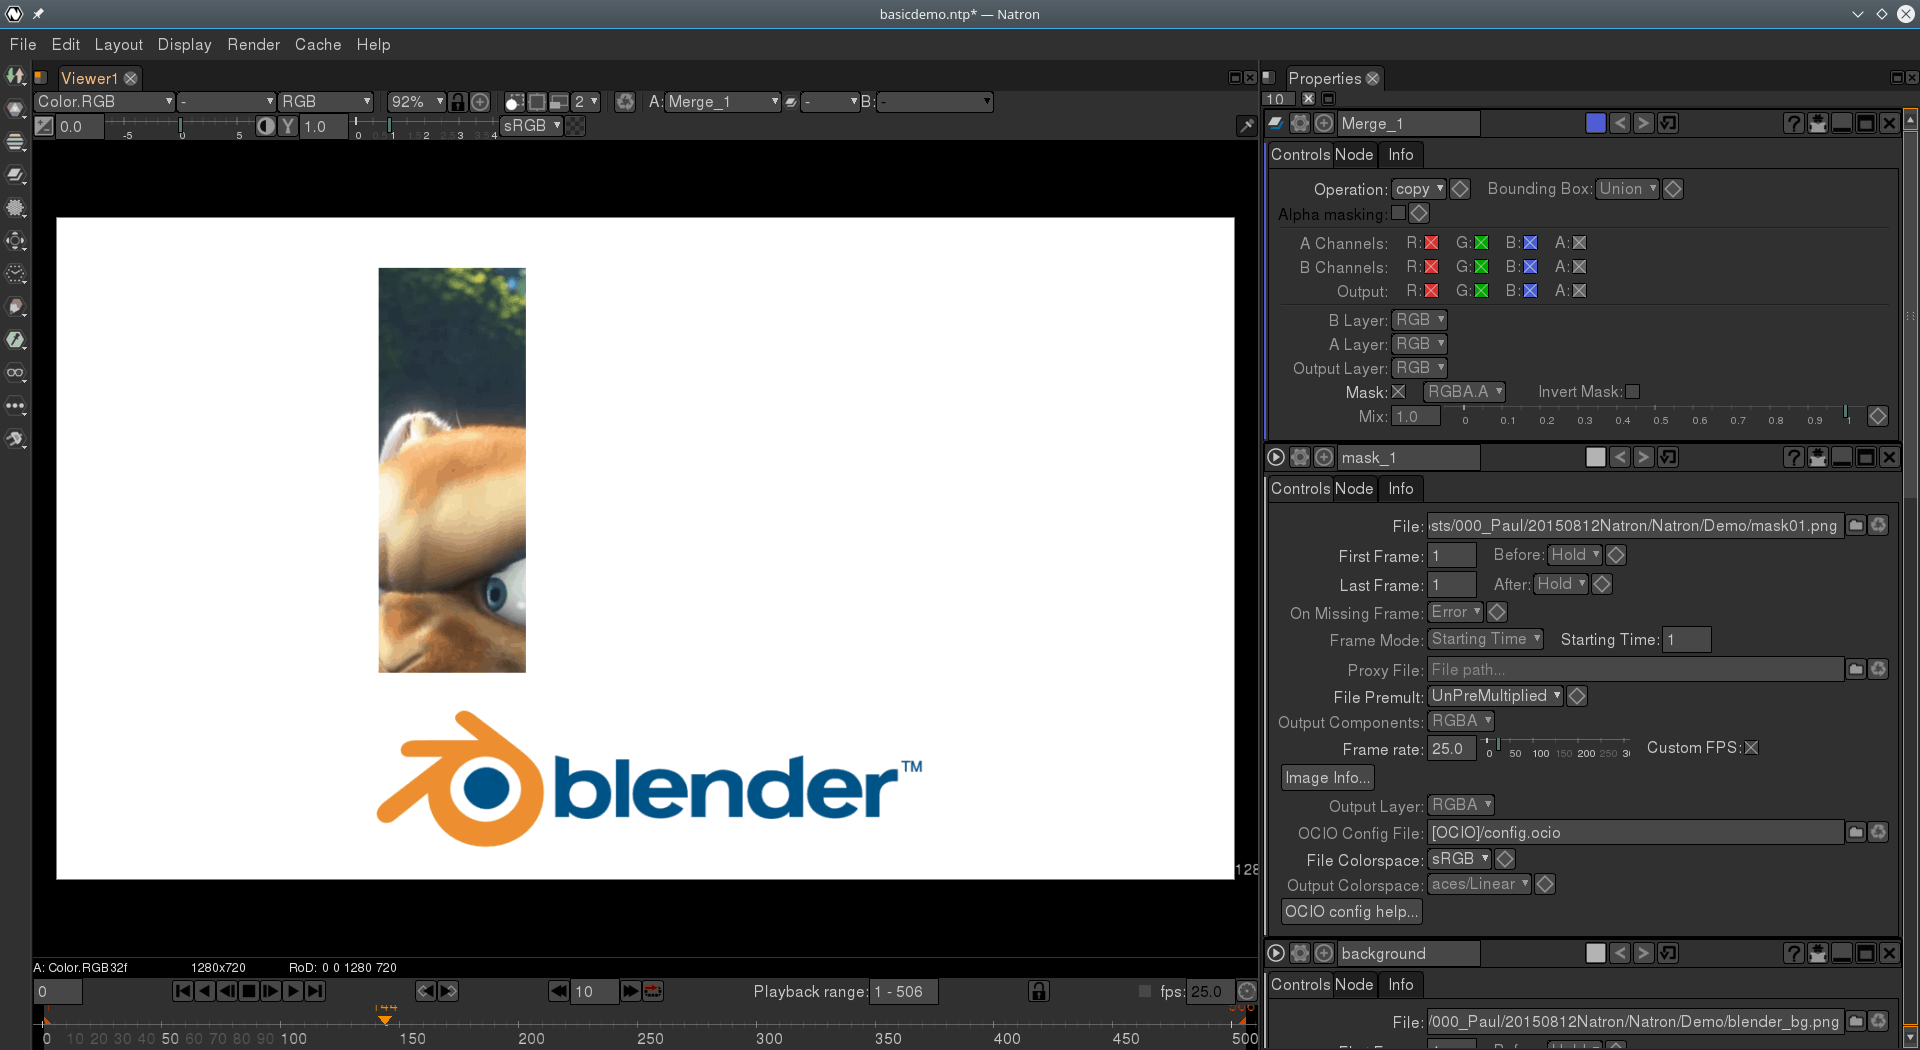
And this is what it looks like in the viewer.
Doesn’t that seem simple and straightforward? Once you get your head round the whole node paradigm, it does come over as logical.
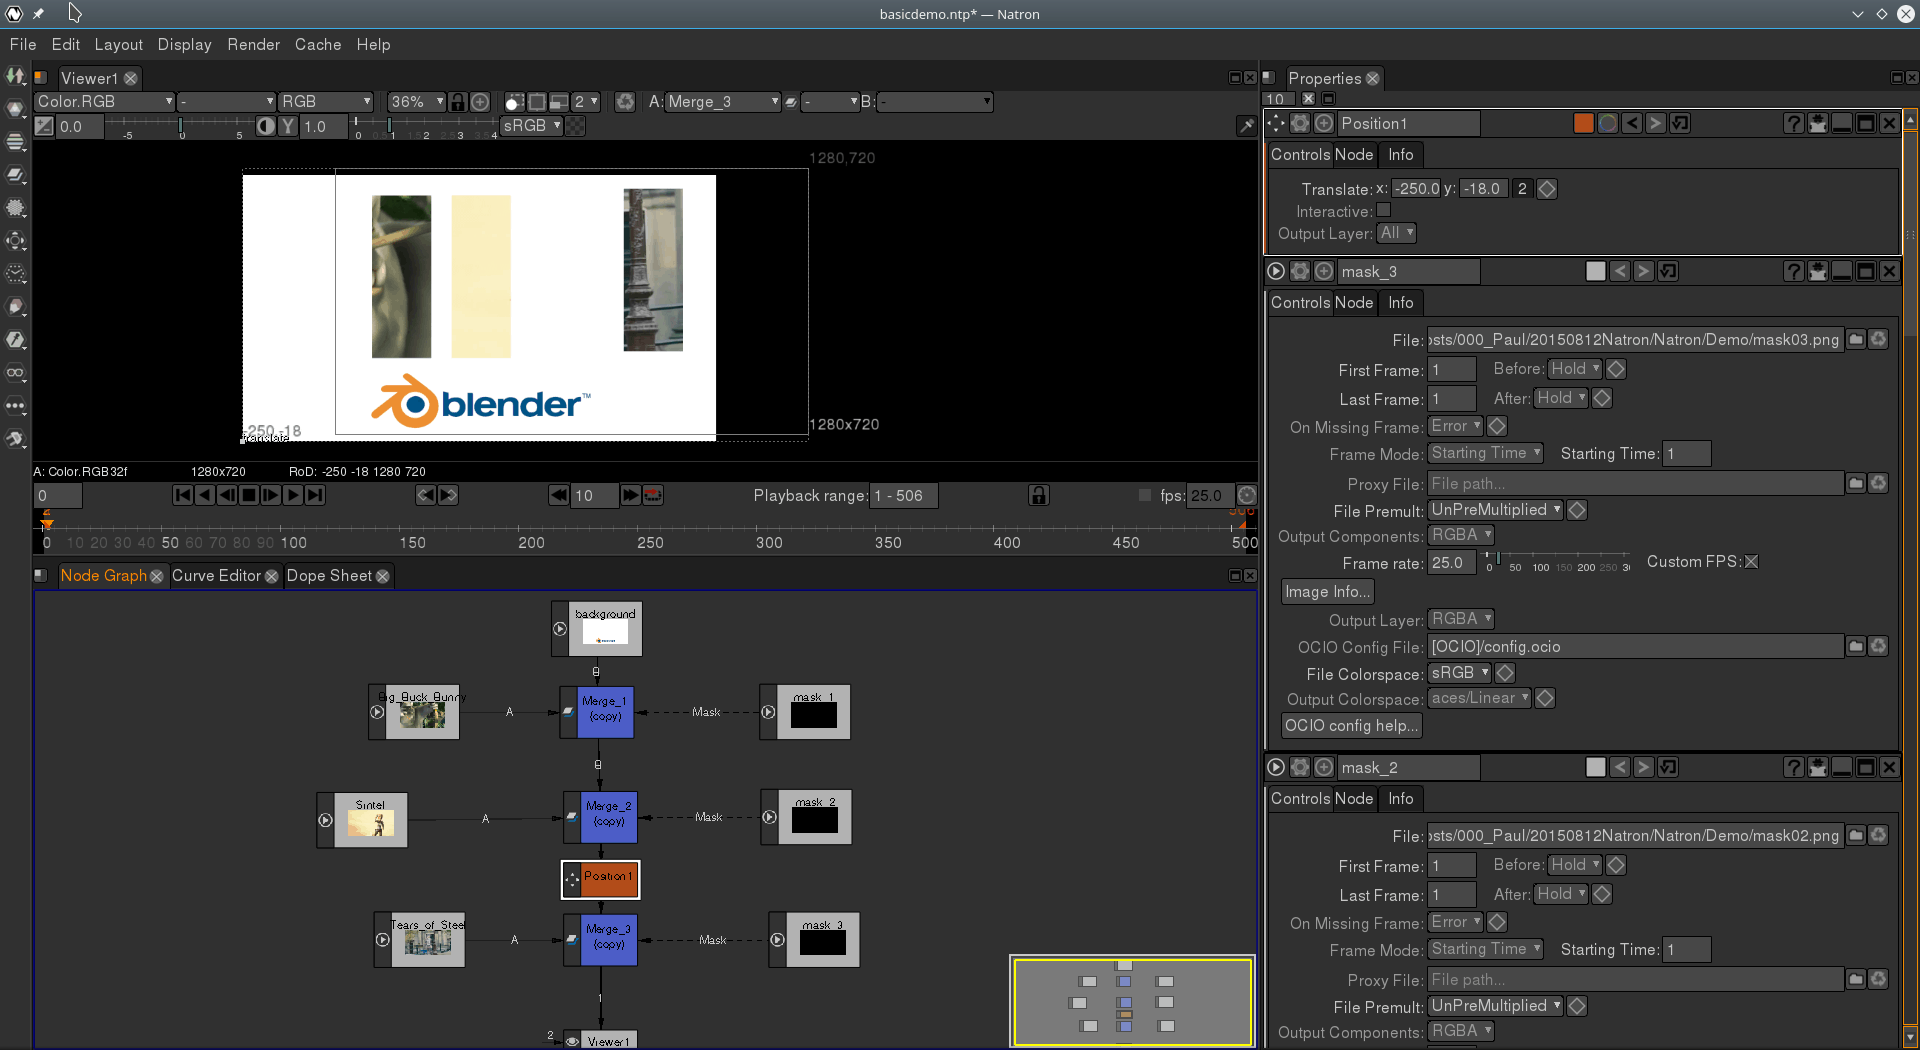
In fact, building the three-window-within-a-frame clip is quite easy: you just pile similar groups of nodes between the output and the viewer. The whole map of nodes you can use looks like this:
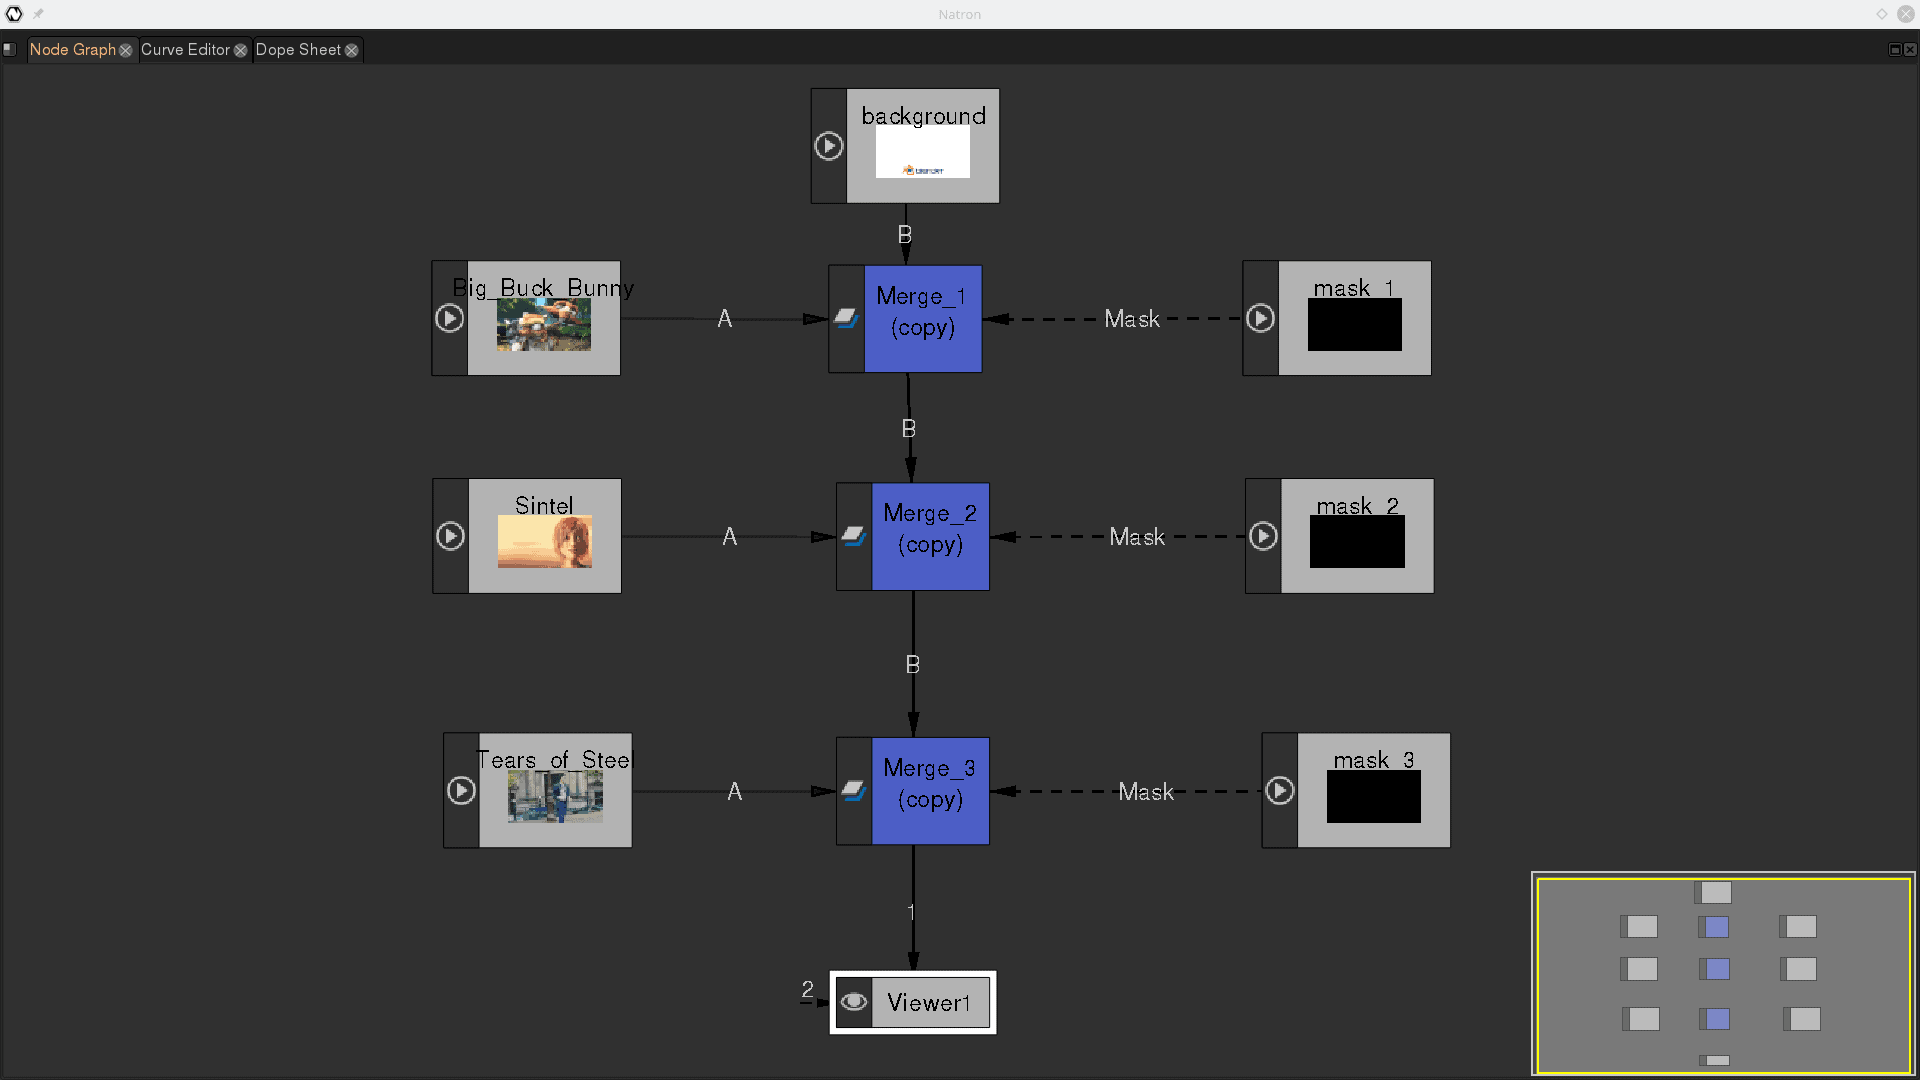
Making three windows is just a question of piling on the nodes.
Which results in this output:
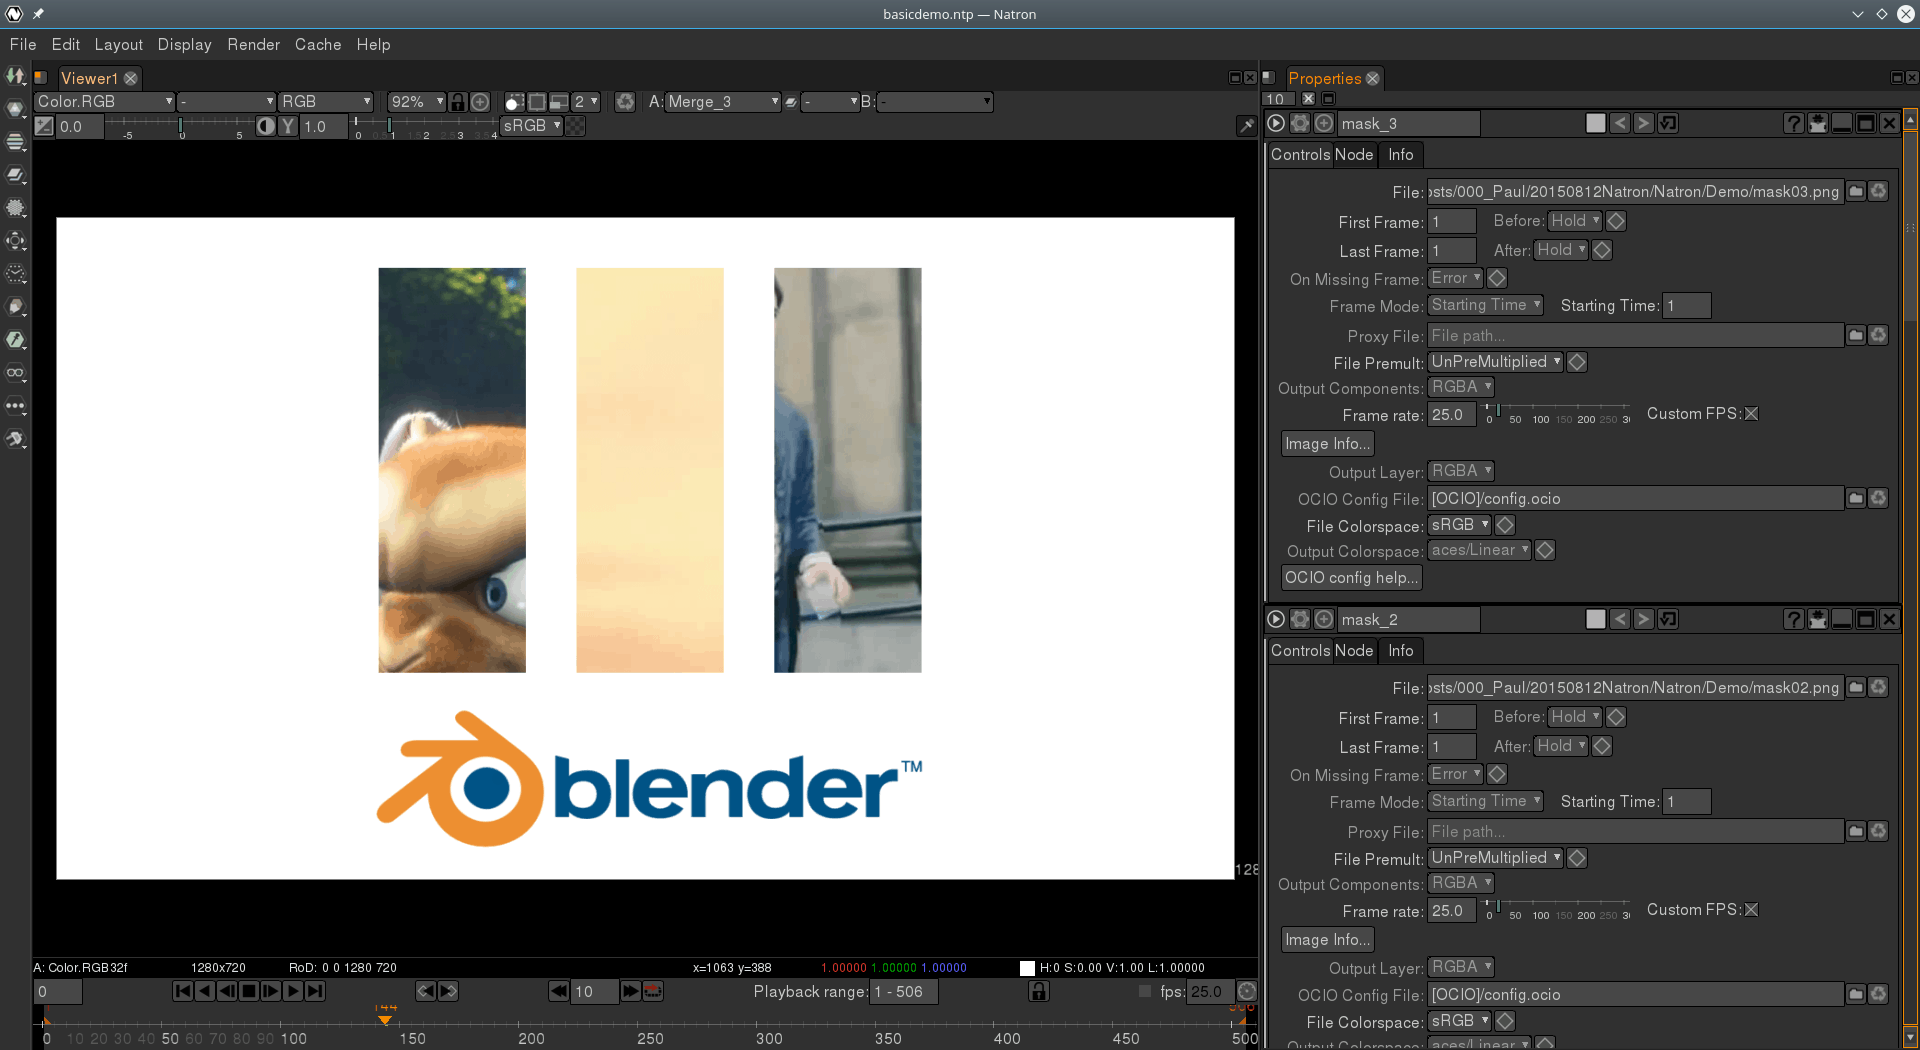
Challenge complete!… Or is it?
Moving Clips Around
That wasn’t hard at all! But then again, the result isn’t completely satisfactory. As with the Kdenlive clip, the main subjects are often “out of frame”, meaning they can’t be seen through the “windows”. One solution is to move and maybe scale the clip so that the subject is visible most of the time.
As with everything in Natron, you do this with nodes. In the middle section, for example, Sintel is off to the right. Let’s pull the clip to the left so she is framed in her rectangle. Right click in the Node Graph and choose Transform > Position from the pop-up menu. Drag the new red node between your Sintel node and its merge node. It should connect up automatically.

Place the position node between the clip node and the merge node to move the Sintel clip around.
A small handle will appear in the bottom left of the preview. It is labelled “translate” which is technical jargon for “move around”. Highlight the position node in the Node graph and place your cursor on the handle. Click and hold, and you will be able to drag the clip around using your mouse.
If you need to zoom in and out of the preview, you can do so with the mouse wheel. You can pan around the preview by holding down the middle button/wheel on your mouse and then dragging.
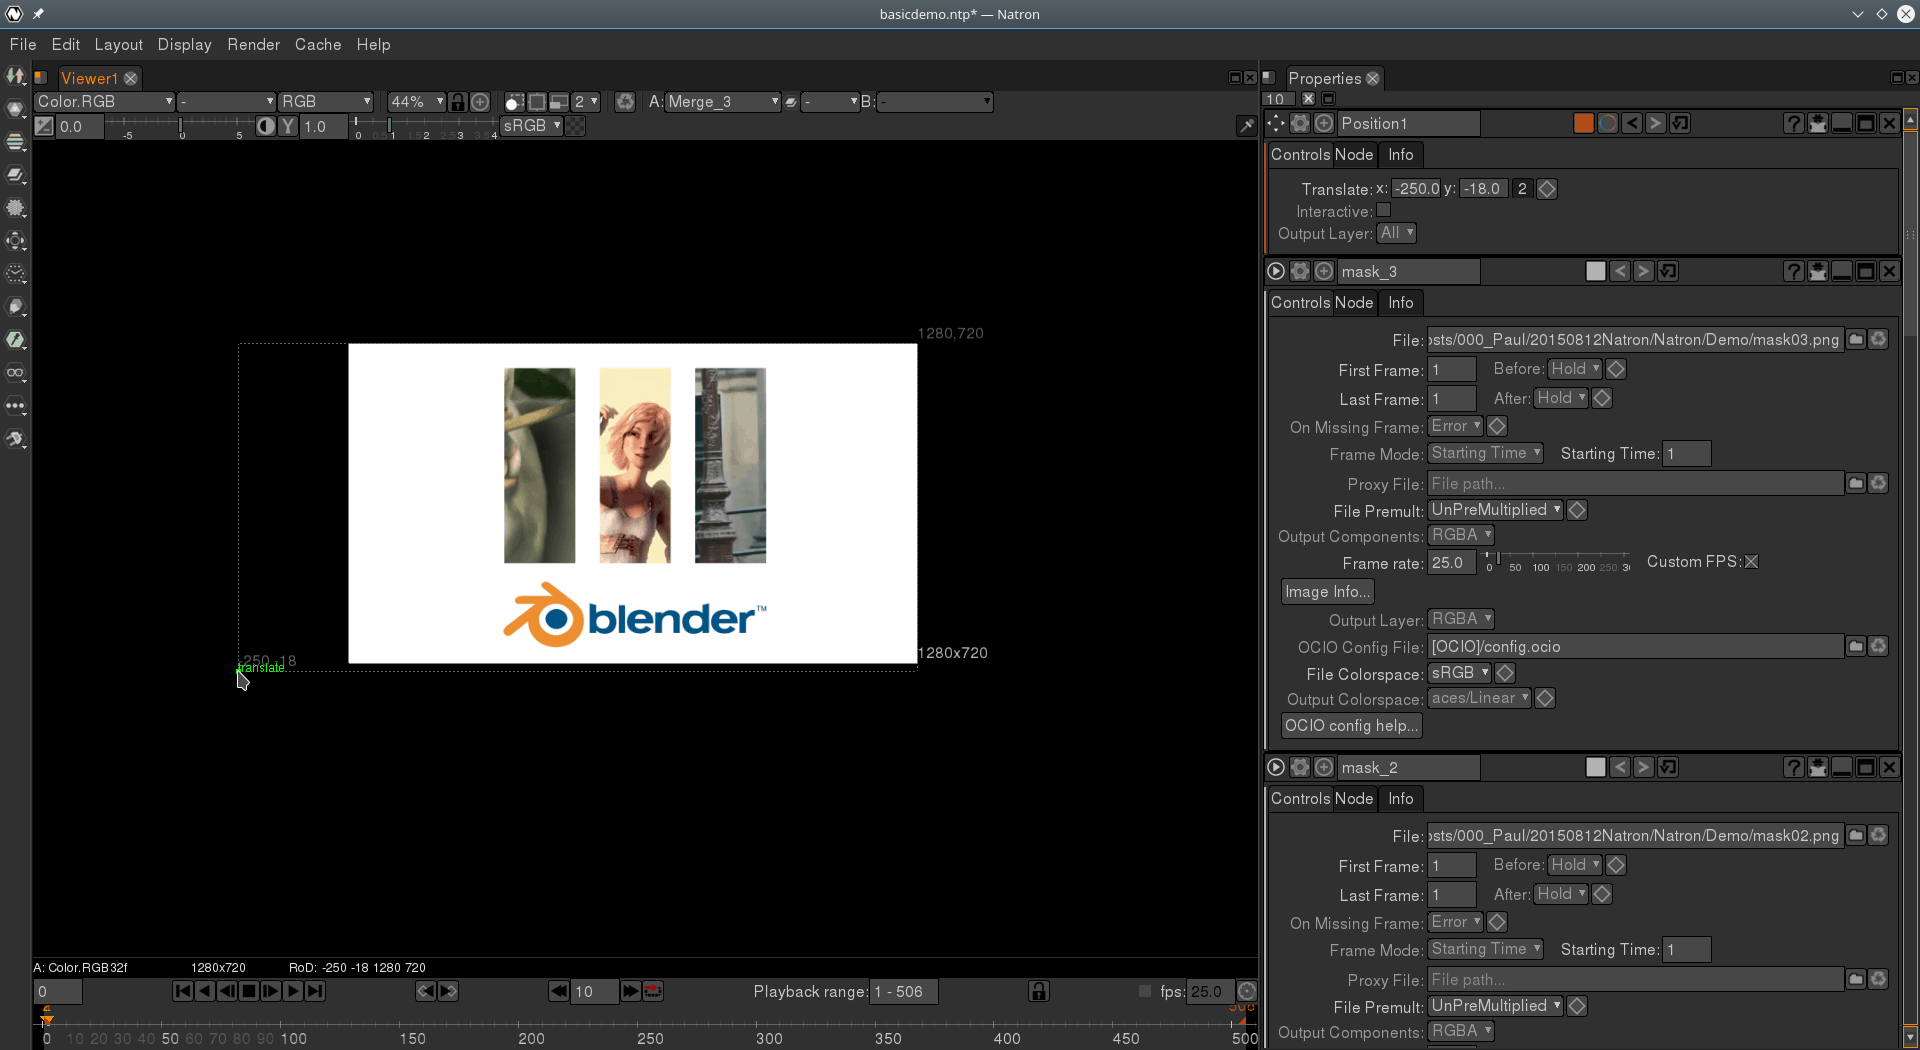
You can move stuff around by dragging on the translate handle.
You can also place the clip by adjusting the values in a position node’s properties. Double click on the node to bring its properties box up in the stack and type in the values you need in the x and y boxes — (0, 0) is the bottom left hand corner, by the way.
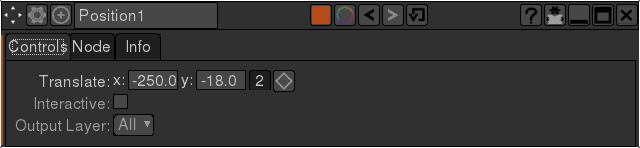
You can also adjust the position by changing the node’s properties.
Notice how changing the location of a node within the tree affects the final result in different ways. For example, if you put the position node down between the merge nodes, it will affect everything above it.
As with most things in Natron, the position node is keyframeable. This means you can animate the effect by setting up keyframes with different positions along the timeline and letting Natron interpolate the intermediate positions.
Changing a node’s position changes the output.
Let’s try it! Make sure you’re at the beginning of the clip by clicking on the First Frame button in the preview (|<) and move the clip so Sintel is visible through the rectangular window as explained above. Next click on the animation button next to the translation parameters in the position node’s property box. The animation button is a square with a diamond in it. Clicking on this button will bring up the Animation menu.
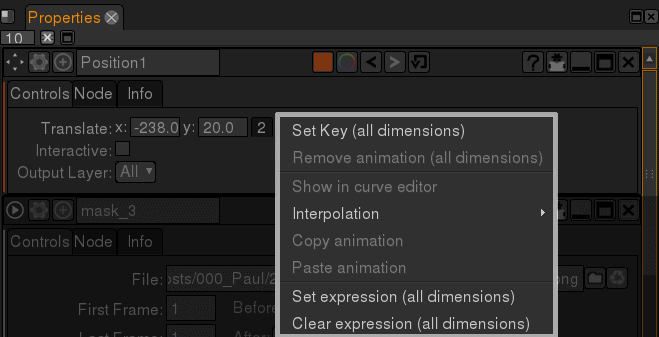
The animation menu allows you to set keyframes and adjust how Natron will handle your animation.
Pick Set Key (all dimensions) from the menu. The boxes containing the x and y parameters will turn blue. You have just set your first keyframe.
Now, in the preview, move along the timeline (you can use the regular play or the frame-by-frame play buttons, or place your cursor in the viewer, hold down your [Ctrl] key and scroll with your mouse wheel) until Sintel starts to move out of frame. Insert another keyframe (Animation menu > Set Key (all dimensions)) there. This will keep her in frame and stop the clip from drifting.
Continue along the timeline until Sintel is nearly completely out of frame. Using the translate handle explained above, drag the clip until Sintel is completely framed again. Just by moving the clip, Natron will automatically insert yet another keyframe, so you don’t have to do anything.
Keep moving along the timeline, stopping now and then to move stuff back into frame, and every time Natron will insert a new keyframe for you.
When you’re done, play back your clip and you’ll notice how Natron has interpolated all the intermediate frames between keyframes to make the panning movements as smooth as butter.
Inserting keyframes by hand is kind of fun and oddly satisfying for a while, but if you have to manually jiggle your clip around every time something moves out of frame, you’re going to get bored really quickly. Plus it is very prone to errors and impractically time-consuming.
Luckily there’s a way you can make Natron do the dirty work for you…
Tracking
In fact, a much cooler way of dealing with things slipping and sliding all over the place is by using tracking.
For simplicity’s sake, let’s start a new Natron project just with the Tears of Steel clip (clip_Tears_20sec.mp4), the background (blender_bg.png) and mask 3 (mask03.png). As mentioned above you can download all these elements from our Drive account.
Start by connecting the Tears of Steel clip to the viewer so you can see what you’re doing.
Connect the node with the Tears of Steel clip to the viewer.
This clip is good for this exercise because, if you run it, you’ll see its one clean shot with a clear subject, Thom, the protagonist, walking across the frame. Your aim is to track Thom’s face so you can later use the data from the tracking to keep him centred within the rectangular window.
Bring in a TrackerPM node (right click in the Node Graph area and then choose Transform > TrackerPM) and hook it up between the Tears of Steel and viewer nodes.
To add a tracker, bring up the TrackerPM property box in the pane on the right, and click on the little [+] button at the bottom of the list of trackers (which should be empty at this stage).
Click the little + button to add a new tracker.
The tracker will appear in the middle of the viewer. Clicking and dragging the central node you can place it on what you want to track. The inside rectangle must land on and cover the Pattern, i.e. what you want the tracker to follower. Make sure this rectangle covers Thom’s facial features — eyes, nose and mouth, since these are quite easy to identify from frame to frame.
Natron plays back the clip as it is tracking so you can see what it is doing.
The outside rectangle covers the Search Area — that’s the area within which the tracker can find the pattern when it moves. The search area should cover most of Thom’s head.
Export the tracker data to stabilize the clip around Thom’s face.
Now is when things get seriously interesting. At the top of viewer you will see a new toolbar with a set of playback-like buttons. Click the arrow pointing right, and Natron will start playing the clip, while tracking Thom’s face. Let it finish before you go on to the next step.
Done? Good.
Now you’re going to export the data the tracker collected. Within the TrackerPM properties box, make sure your tracker is selected in the list (it has to be highlighted in orange as shown above), and click on the Export data drop-down and pick CornerPinOFX (Stabilize.Linked). Then click the Export button.
Natron wil create a new CornerPin node. This node allows you to translate (= move), rotate and scale a clip. In this case it is going to translate the clip using the data it is getting from the tracker. Drag the new CornerPin node so it is between the TrackerPM node and the Viewer node and make sure it is connected above and below.
Connect the CornerPin node to the Viewer to see how the Tracker stabilises the clip around Thom’s face.
You may notice that there are in fact two arrows going from TrackerPM to CornerPin. The black Source arrow makes sure the visual data is passed on down the line, from node to node, until it reaches the Viewer. The bright green arrow carries the tracking data.
Now play back your clip in the viewer. The clip layer moves around, keeping Thom’s face always in the same place. I know I keep saying this, but cool, no?
Add a Merge node to tie together the clip, the background and the mask. Then add a Position node between the clip node and the TrackerPM node to move the whole clip to frame Thom in the rectangle.
Your final node tree should look like what you can see below.
Your clip — with tracking — merged with the background and the mask.
Admittedly the effect does make the character look like he’s gliding through The Matrix, but it is still a pretty sweet technique, right?
HOWTO Render
To actually make a film out of all this, you use a Write node (right click in the Node Graph, Image > Write). This will open a file browser that will allow you to pick where and how you save the rendered film.
The Natron pundits recommend saving your render as a sequence of separate images containing the frames. That is also the default. After you have chosen where you want to store the frames, set a generic name, something like frame###.jpg. This will store your movie like this:
frame001.jpg
frame002.jpg
frame003.jpg
.
.
.
… and so on.
Disconnect the Viewer node from the node tree, and place the Writer node in its place. Bring up its property box, check everything is as you want it, and then press the Render button.
When Natron has finished rendering, you can assemble the frames into a movie with FFmpeg like this:
ffmpeg -start_number 1 -i frame%03d.jpg -vcodec libx264 mymovie.mp4
Problems
I did manage to crash Natron once or twice. Then again, I was using a nightly build instead of the stable version. In general, though, Natron took abuse like champ, and, when it did crash, on restart, it always recovered the files from autosave, so no biggie.
There were also problems when previewing my work: playback stuttered and froze for several seconds at several points when working with multiple clips and complex effects. You can supposedly avoid these problems by using proxy images and clips. Proxies are dummies or lo-res versions of your clips you can use inside Natron instead of the original, high res clips. The idea is that they should lighten the load on the previews. However, I didn’t notice much difference. Then again, I may be using this feature wrong. As the documentation is scarce on the subject, it is hard to know.
Which brings me to… Look, I won’t rant too much about the lack of documentation in this case. Natron is a very young project and it is kind of logical it still has big gaps in the way of tutorials, walkthroughs, and manuals. But, a word of advice to the project leaders: get somebody onto this now, or your software will suffer like so many other open source projects.
Conclusion
As with the graphic apps (Inkscape, GIMP/Krita, Blender, Scribus, etc.), there is not one global, integrated solution for video editing in the Free Software camp. But I personally see no problem with this at all. As long as they all output in formats that the others can read from, this is the kernel of the Unix/Linux way of doing things.
Kdenlive does a lot of things, but what it does best is cutting, editing and splicing clips together and maybe the developers should concentrate on that. Natron is a much better choice for manipulating clips, applying effects, creating complex composites, and so on. They can both work together fine, each doing their thing. Besides, remember how we saw that Kdenlive’s native files were XML? So are Natron’s. I can totally see a Kdenlive/Natron integration in the future.
The thing is, instead of having one big, monolithic creative suite, with all tools integrated, you have different teams working on different aspects of, in this case, a video editing suite of apps. Despite many claims to the contrary, there is no deal-breaking nor objective problem with that.
See how I fared editing with Kdenlive in part 1 of this series.
The third instalment is ready: Video editing with Blender: Everything and the kitchen sink.
Cover Image: Camera by Caroline Hummels for Pixabay.com
[sharedaddy]