Open Broadcaster Software, or OBS for short, is a pretty amazing project. Used extensively within the Gaming/Youtubing/Twitching community, OBS allows you to set up a virtual TV studio, combine a variety of video, audio and image sources into one or several “scenes”, and save them or stream them to the Internet.
Everyone wants to be on TV, or at least once upon a time they wanted to. Now we seek our fifteen minutes on YouTube. Add to the glamour of potential fame, the lure of potential fortune in the shape of ad revenue for your channel, and you have a very tempting proposition — only don’t expect much of either: competition on the interwebs is fierce.
However, you can get a leg up on your fellow youtubers if, instead of recordings of yourself sitting in a chair, you do some live shows, maybe with friends, with several cameras and some extra media sources, seasoned with, and here’s the kicker, some live editing.
Fortunately there’s a nice and well-designed open source app for that: OBS started life as a Windows only application, but the authors were unsatisfied with that, and the fact that many of the features were hardcoded and monolithic. They also missed a decent API that would allow third party programmers contribute to the code — OBS is an open source project after all. This prompted the creators to do a thorough re-write from scratch, the result of which is no short of amazing.
The new OBS has a plugin structure that allows for a modular growth in features, and works on GNU/Linux and MacOS X, as well as on Windows. It allows you to manage inputs from multiple cameras, insert media (as in pre-recorded videos), static images, text, record your desktop live (ideal for gameplay and tutorial videos), and composite all these sources seamlessly with each other.
Walkthrough
At first we had a hard time making OBS work. It kept freezing our desktop. After trying several things, including compiling the latest source, we figured that maybe, maybe, this was not OBS’s fault at all, but more driver-related. One kernel update and a messy proprietary driver installation later, everything ran smoothly.
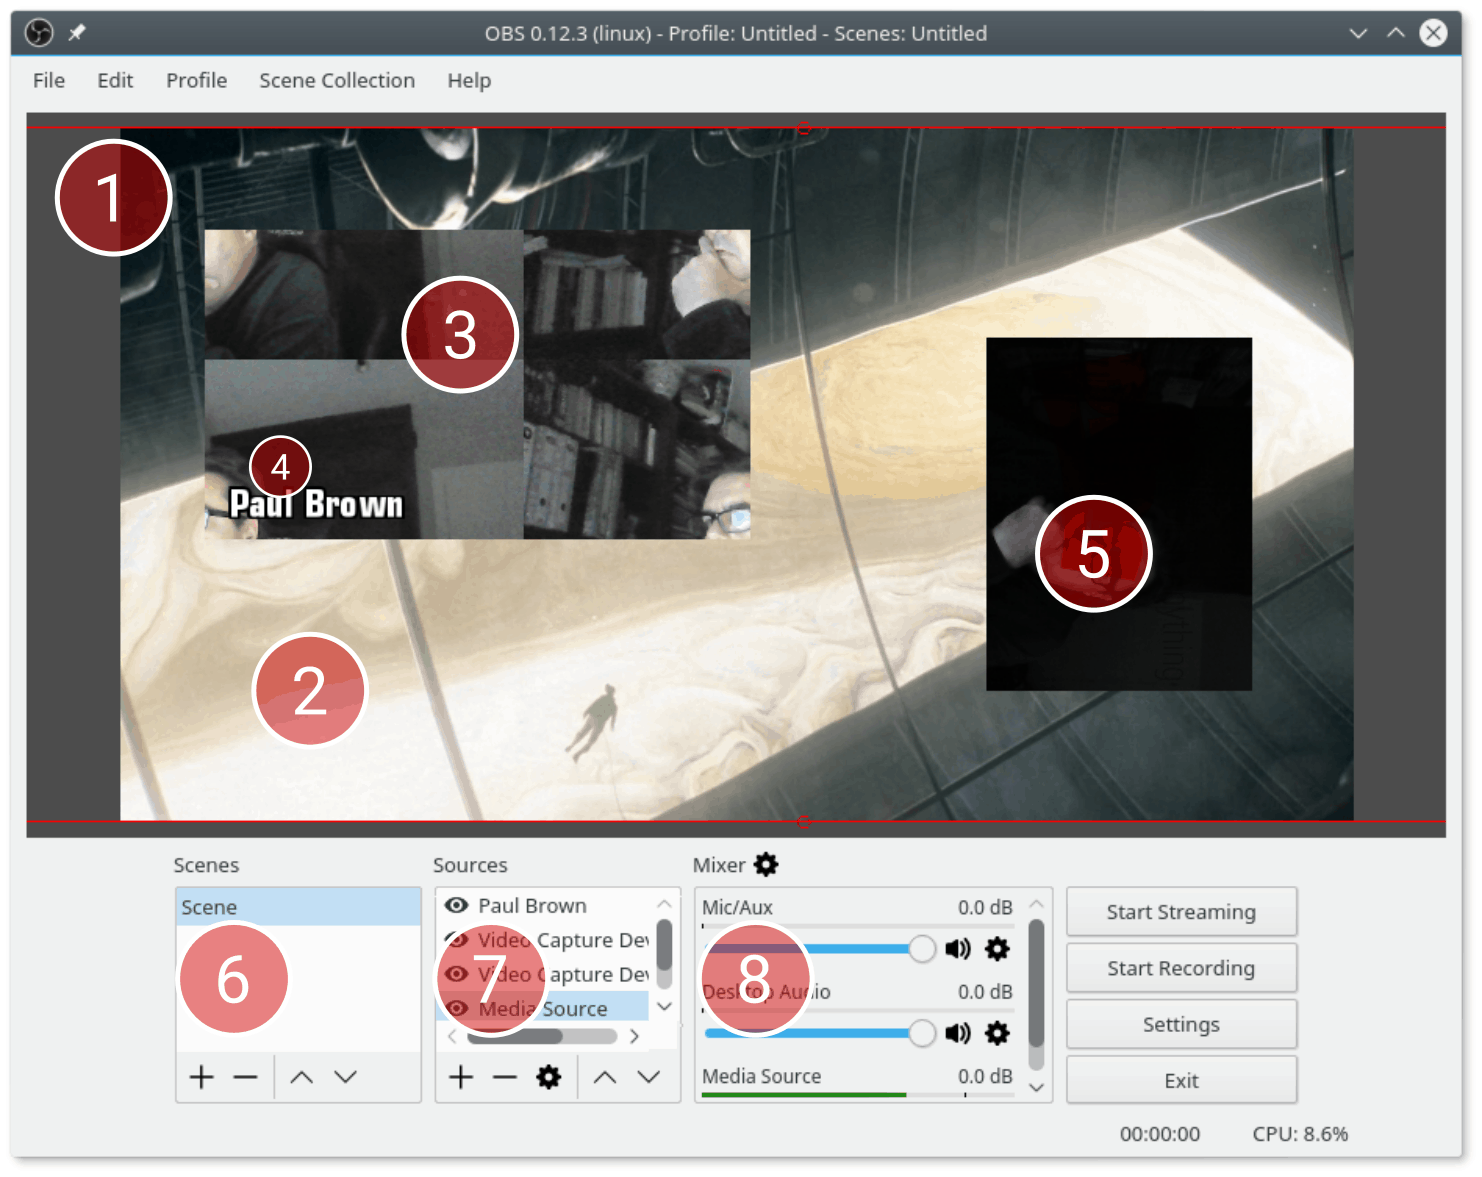
(1) Preview pane, showing (2) a video playing in the background, (3) a feed from a camera, (4) some text, and (5) a feed from another camera (tilted 90º). Pane (6) is the Scene pane, (7) shows the sources, and (8) is the audio mixer.
As mentioned above, OBS can grab video streams from your video cameras, pre-recorded videos, it can capture your desktop, and so on. You add media using the Sources panel (7 in the image above). Click the + button at the bottom of the pane and choose the type of source. If the source requires you open a file, a file browser will pop up and you can navigate to the file’s location. If it is a feed from a camera, you will be able to pick from which camera (if you have more than one).
The order of the sources as shown in the pane is important: it determines how they are stacked one on the other in the preview window. You can click and drag a source within the Sources pane to reorder them, so, if you can’t see something, drag it to the top of the list and see if it shows up in the preview.
The Scene pane (6) allows you to segue from one set of resources to another. Say you have two cameras set up and you want to be able to cut quickly from one to the other. Create a scene for each camera and you will be able to switch between them with a click of your mouse.
The Mixer shows the audio sources all in one place. You can control the volume of each segment that contains sound independently, and fade in and out, and mute each feed. You can also apply audio effects to the soundtrack.
Effects
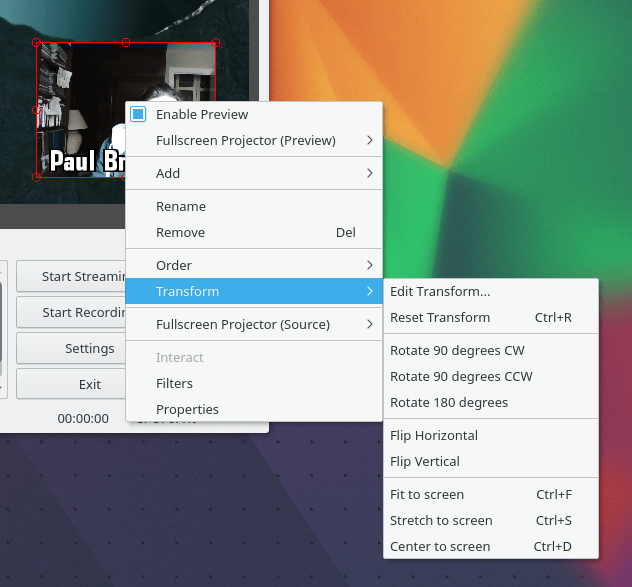
Right clicking and selecting Transform allows you to place, resize, and rotate your sources.
Although you can drag and drop, and resize a source using the handles and your mouse in the Preview pane, right click on any source in the Preview or Sources pane and you’ll be able to fine tune its characteristics.
Use Transform > Edit Transform… if you want to place a source precisely or rotate it a random number of degrees.
The contextual menu that pops up when you right click on a source also allows you to select and configure the filters (i.e. effects) you can apply to each source. Pick Filter from the contextual menu and a new window with two effects panes on the left and a preview pane on the right will appear. Click on the + button at the bottom of each effect pane to see and pick what’s available. You can, for example, create a black and transparent PNG image using Inkscape and save it with its alpha channel. You can then use the image to create a mask to composite two feeds together. You can also adjust a source’s colour, apply a chroma key, and so on.
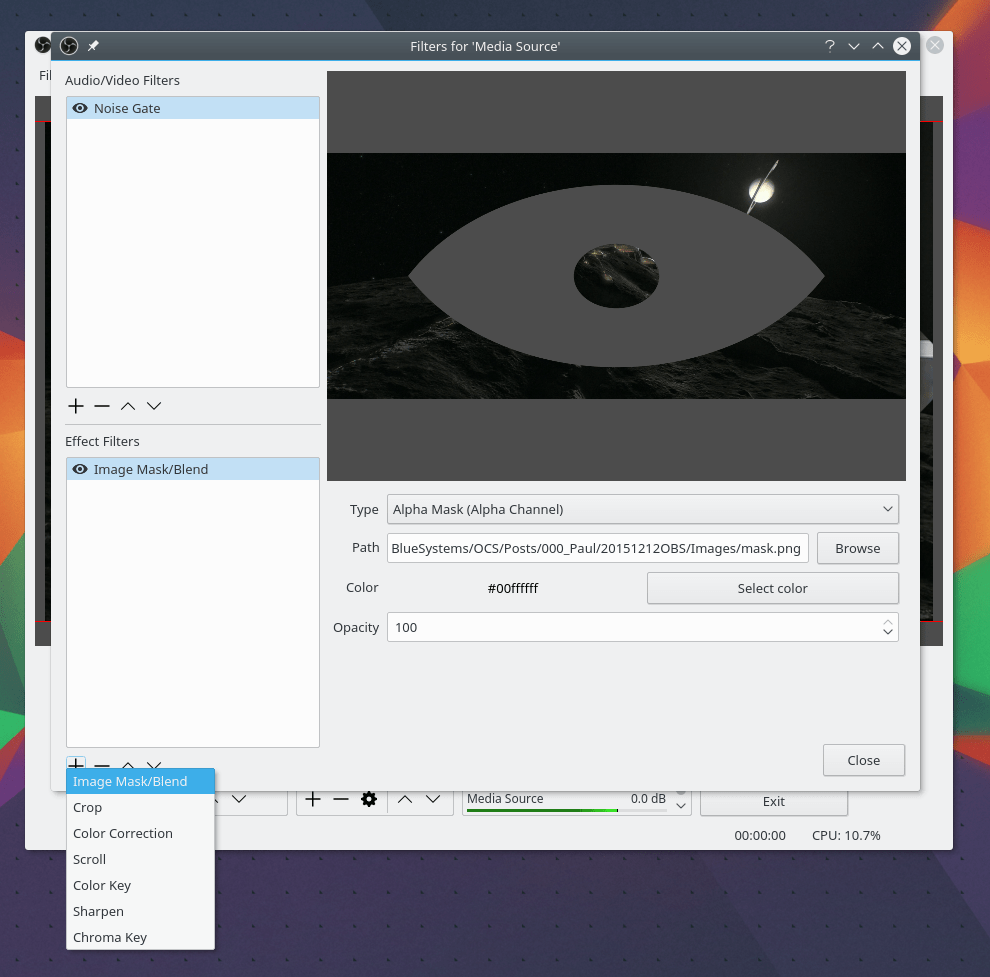
Add filters to your video or audio tracks…
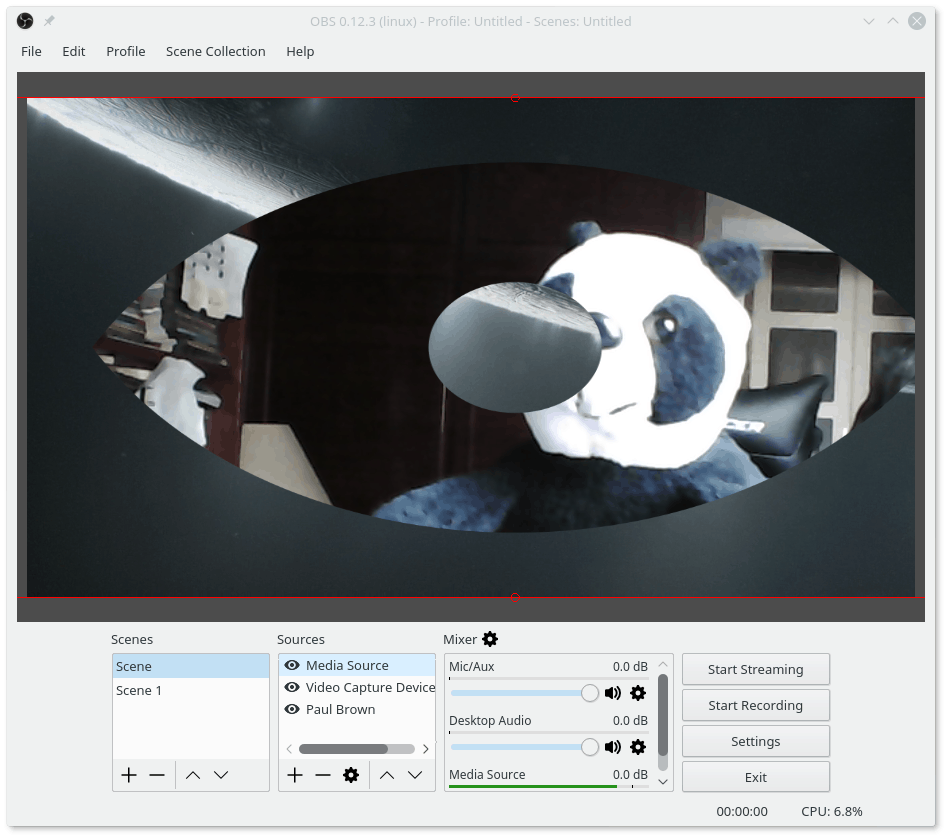
… Like masks to make for a much more interesting output.
Saving & Streaming
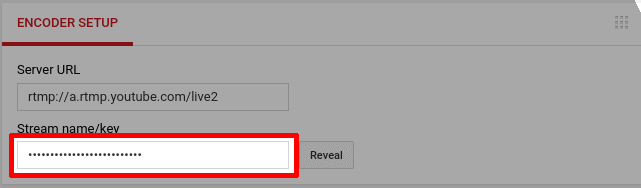
The Stream name/key you get from YouTube…
Recording a stream to a local file is as simple as pie. Just press the big button that says Start Recording and OBS will save your stream to the directory you set in Settings. This is perfect for recording, for example, screencasts: as OBS allows you to record you desktop and from your webcam at the same time, it is ideal for a Picture-in-Picture with the tutor in the bottom right hand corner explaining what’s going on.
Streaming is slightly more complex, but not overly so. Say you want to stream to your YouTube channel. Open YouTube on your browser and pick My Channel from the side bar. Click on Video Manager at the top of the page, and choose LIVE STREAMING > Stream now from the side bar.
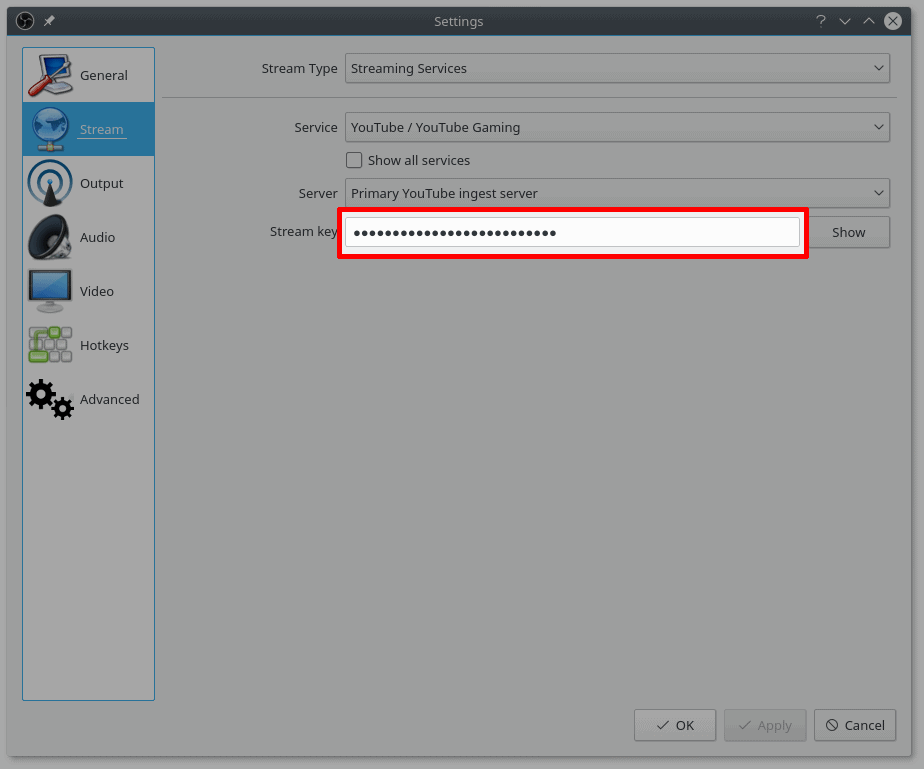
… Goes here in OBS.
Scroll down until you see the ENCODER SETUP box. Click on the Reveal button to show your key and copy it to your clipboard. Open OBS and click on the Settings button, and then on Stream. Pick YouTube/YouTube Gaming from the Service dropdown, and paste the key you copied earlier into the Stream key text box. Click on Apply.
Now you are ready to stream: click on the Start Streaming button in the main interface and, after a few seconds, you should be live on your YouTube channel.
You can, of course, do both things at the same time and record and stream simultaneously. In Settings, click on the Output option, and pick Advanced from the Output Mode dropdown. This will open three tabs that allow you to configure Streaming, Recording and Audio.
It takes only minutes to get your live stream up using OBS.
Conclusion
One thing I miss off the bat is the ability to transition from one shot to another. Sure, you can do hard cuts clicking on a different scene in the Scene panel, but there is currently no way to fade or wipe from one scene to another.
Also be warned you will need to run OBS on a machine with an Nvidia or AMD GPU. In the former case, you will also need to run the proprietary drivers. Nouveau or Intel GPUs just won’t cut it and you’ll face numerous crashes that will lock up your whole computer if you try. This is something you definitely don’t want happening while streaming live!
Having said that, OBS is excellent! It not only provides what it says on the package, but it is light and simple to boot. While playing with it, the CPU usage (shown in the bottom right hand corner of the main interface) never rose above 8%… And I messed around with it A LOT.
For remote teaching, demos or just pure entertainment, OBS is easily the simplest and most powerful streaming utility you can find out there.
Cover foto: Television Broadcast System by d-s-n for FreeImages.com
[sharedaddy]

The newest version enables you to preview the next scene before it goes live and includes some transitions. We use OBS to stream our high school football games. We use Live.Score (https://live-score-app.com/) to display a very professional looking scoreboard on the stream, and we also have some custom tools that I made to include fan reactions shared on social media. It is very versatile.
But still, the browser plugin is a problems in the Linux version of OBS…
It is a really sad thing. My setup is around Linux Motion which transmit over http
tcpip on the port of your choice. When used in conjunction with MSWindows 10
IT works like a charm. (Linux machine, Motion + Windows 10, OBS latest).
Linux Motion is for local broadcasting in a webpage. I dont want to implement
rtsp private server.
any idea, documentation ?
thanks