One of the things about Linux is it’s super-customisable. If you would like to go deeper than picking your desktop and the colour scheme of your icons, consider SUSE Studio, the online service that allows you to build a whole distro from the ground up, tailored to your specific needs.
I you are considering building your own distro, you could go hardcore and old school on your project, and download the Linux From Scratch manual — and, don’t get me wrong, setting up a distro using LFS is great educational experience and is something I would heartily encourage you do if you’re at a loose ends for a couple of weeks.
However, if you need a quick fix or you are not confident enough yet to be compiling your kernel, or configuring your init scripts with ed, SUSE Studio may be the way to go.
Why bother?
Contents
I realise this is becoming a trend here, but again this is a very long post, and much of it may not be relevant to you. If you need to jump to the parts you’re interested in, here’s a handy index:
There are whole lists of good reasons to build your own personal distribution, none if which include “everybody else is stupid and they don’t know what they’re doing”. If you think you know better than everybody else, by all means be my guest, but, if that is your sole reason, I’m going to posit you are probably going to duplicate, triplicate, or even tetraplicate somebody else’s work, and you should do more research into what you are looking for.
Notwithstanding, as I say, there really are some good reasons to build your own distro. As I was trained as a teacher, the following example is taken from what I needed for a very concrete school situation, but it shouldn’t be hard to extrapolate the usefulness of this kind of service to other contexts.
At schools, machines in computer labs accumulate such an immense amount of digital gunk you wouldn’t believe. It is not only stuff like bloatware, adware and malware, but also all the stuff that got installed deliberately and for legitimate reasons, outlived its usefulness, and never got deinstalled, plus all the rubbish students install just for kicks & giggles. By using your own distro on, for example, a USB stick, you can skirt what teachers and students over the course of years have dumped on the internal hard disk, while at the same time not contributing to the bit-landfill.
Related to the above, if you keep a master copy of your distro in a safe, non-writeable media (I’ve still got blank DVDs hanging around), you can restore the students’ USB thumbdrive versions to their pristine original condition when (not “if”) they mess it up.
If you require a very specific set of tools (and continue reading to see how very specific those tools can be), and not others, by using a tailor-made, bootable image that contains said tools, you will never have to fear seeing them accidentally deleted by an overzealous sysadmin or clumsy fellow teacher with too many privileges. Likewise, you will avoid conflicts with fellow teachers who have set up machines in a certain way and want them kept that way.
In a more business-like context, if you have to demo scheduled with customers or need to test an application without having other processes interfere and/or conflict with it, this may be a good solution. During your presentation in front of investors, just whip out your thumb-drive which you have configured with the perfect appliance to support your app, plug it into the demo computer and you’re totally dodging the bullet of having someone else’s software mess with yours.
And then there’s wanting to have your own customised bootable distro because, well, you feel like it. Nothing wrong there: Linux allows you to have the stuff you want, the way you want it, and nothing else. That’s its beauty and your privilege as a user.
Why do it like that?
There are several ways to build a custom distro image, but I would argue that building one with a service like SUSE Studio is probably one of the smartest ways to tackle this task.
Going all Linux-From-Scratch, as mentioned above, is an excellent educational exercise, but is only okay if you have a lot of time. There are other tools that grab your current installation, with all the software and tweaks you have accumulated over time, plus all your personal configurations, and turn everything into an image you can dump onto a USB Stick.
However, this strikes me as doing things the wrong way around. The same way you don’t build a palace to knock bits down until you end up with a manageable family house, it seems to me that you would create a distro with the minimum to boot, run a basic GUI (if needed), with the bare minimum tools for the task at hand and build up from there.
Besides, even if you started off small, on a real-life version of a system, if you have been using it for any length of time, it is going to have accumulated fluff despite your best efforts. Even if you have installed Linux onto a contained device and then slowly shaped the distro, by de-installing, installing, stopping services, and configuring, there are still are going to be tons of services and installed packages you are not sure you are going to need or not. By building a custom image you can limit this issue to some extent.
Before we continue, please note this article is not sponsored by SUSE or in any way an endorsement of SUSE Studio over any other service. If you think there is something better out there, please chip in in the comments below and help give the service you prefer a bit of exposure.
Building a Distro
Here’s the situation: I was volunteering teaching Arduino and basic electronics at a school nearby and their computer lab sucked. They not only suffered from all the problems mentioned above, but I hadn’t realised how badly Windows XP (yes, XP is still very common in schools) and 7 interact with Arduino.
In GNU/Linux it’s easy. Plug a USB cable into the Arduino, plug the other end into your computer, and you’re in business. Not in Windows, oh no! You need drivers and administrator rights, and god knows what else. Another problem was that, for some reason, on some of the computers, every time we rebooted, we had to go through the install process again. The whole 15 minutes of it. Every. Single. Time.
Taking everything into consideration, I figured it would be much more convenient to have a Live bootable environment, preferably copied on to USB thumb-drives, so the students could record their work and take it home. We had about 20 kids split into groups of three, which meant we only needed about six or seven sticks. We quickly found enough memory sticks forgotten at the back of drawers and down the sides of sofas, and we were half way in business: we had the hardware, we needed the software.
SUSE Studio allows you to log in with a Facebook, Google, Twitter, Yahoo, OpenID or Novell (?) account. Once logged in, actually creating a distro is quite simple. In short:
- Choose a template and give your project a name
- Add and remove software packages
- Configure users, passwords, and so on
- Build and download
However, things can get complicated, so let’s chack out things in detail.
On the first screen, click on Create new appliance… to start building your distro. First you have to choose a template — notice that SUSE Studio does quite a bit of hand-holding from the very beginning. You can base your distro on the latest openSUSE Leap (the new standard release version, as opposed to Tumbleweed, the rolling release version of openSUSE), openSUSE 13.2, and several older SUSE Linux Enterprise versions. Within each category, you can choose between a Just enough template that gives you a very basic set of packages; a Server template, that gives you a text only system, but with common server and administration packages; or a desktop template, which lets you pick between a GNOME or a KDE4 environment. You can also clone any of the over 12,000 appliances shared by other users in the Gallery.
My project is pretty vanilla and I need a desktop for my students. As I am a bit KDE inclined, I’m going to choose the latest Leap (42.1 at the moment of writing) and mark the KDE4 radio button.
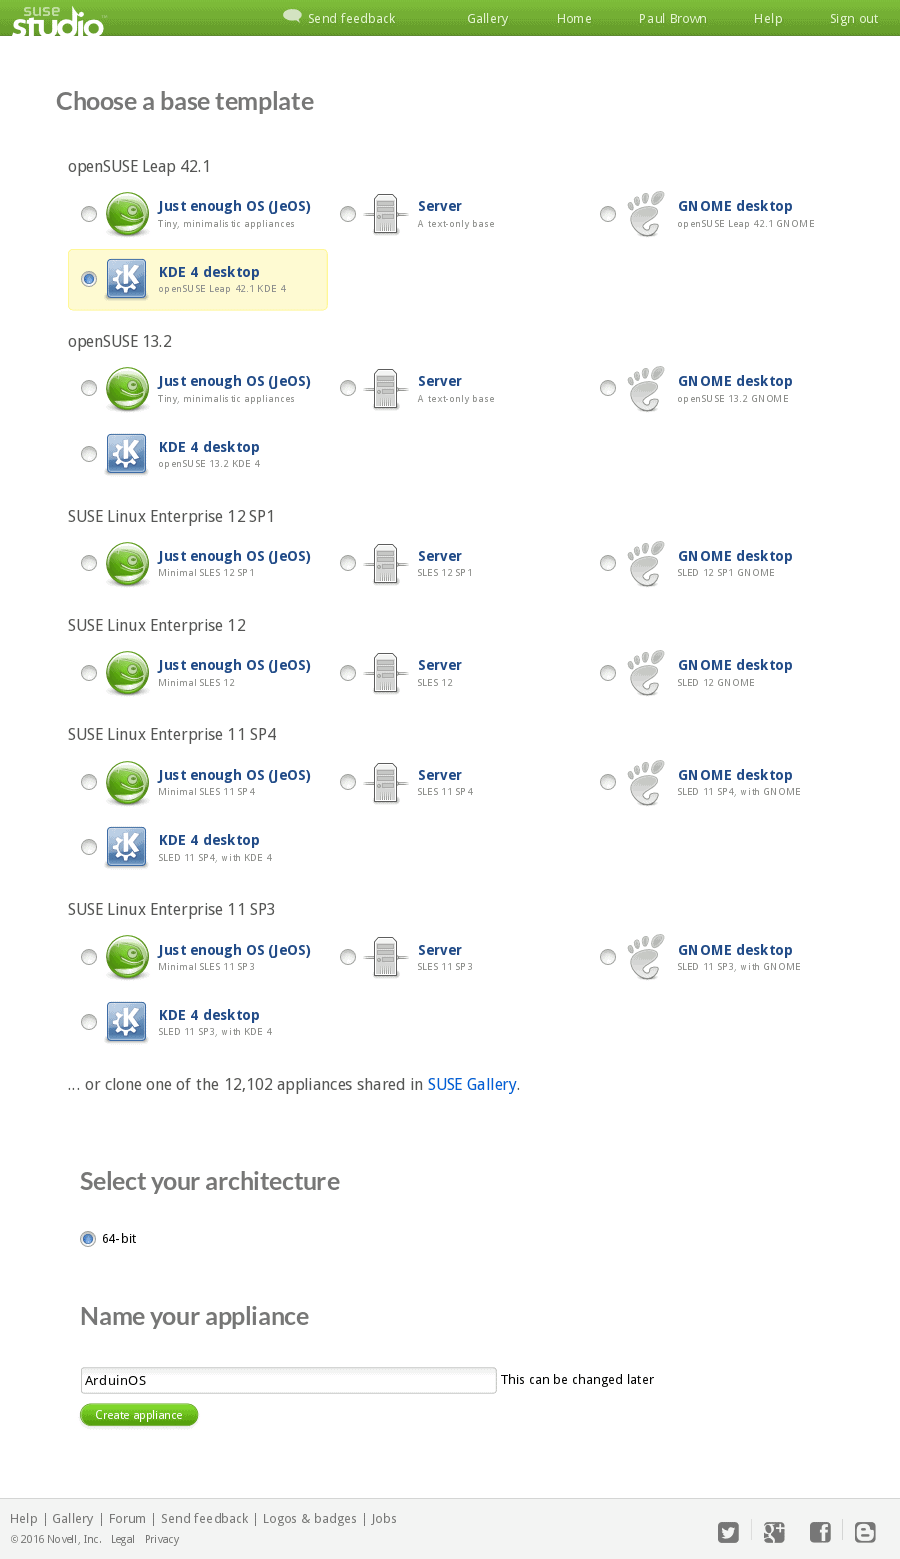
Choose a template to base your distro on.
The next step is naming your product. I’m calling mine ArduinoOS.
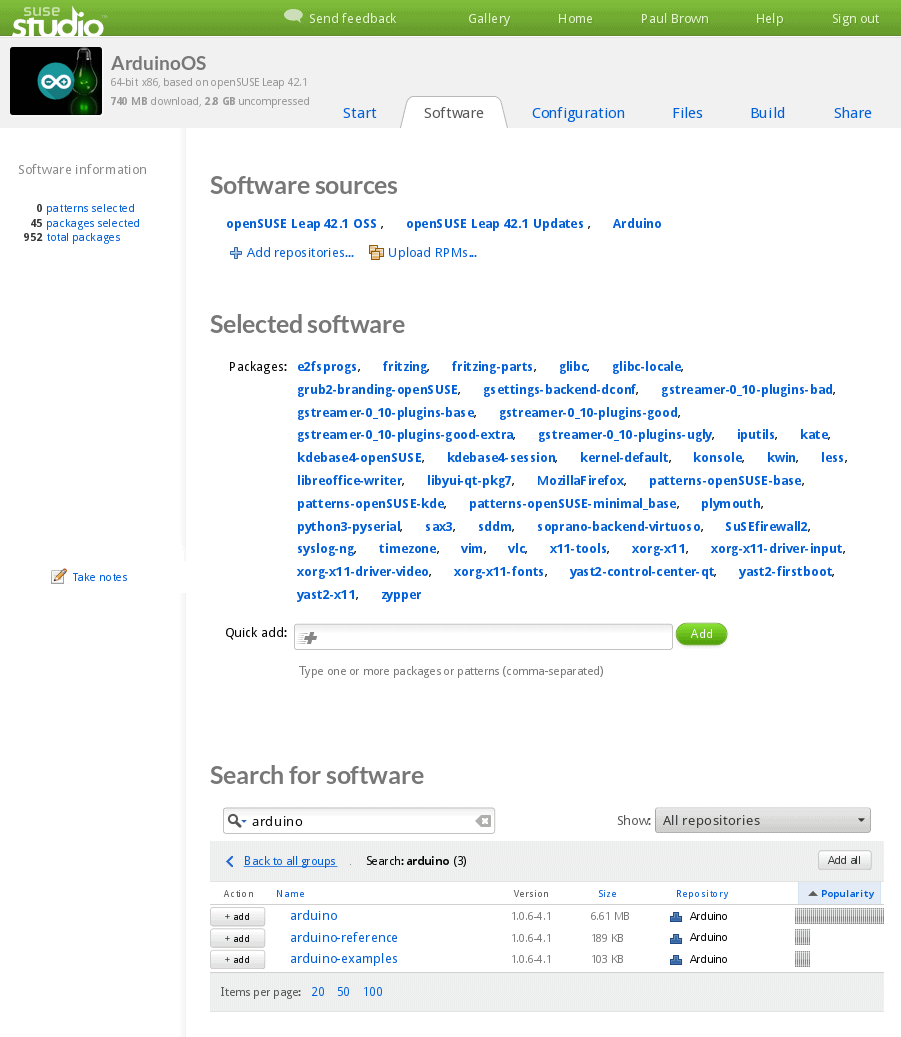
The next tab is where things get meaty. Under Software you can add and remove packages that will go into your distribution. You can browse software by category or search for specific packages using the search box. As a general rule, try sticking as much as possible to the provided repositories before looking into exotic ones. The default repos contain tried and tested software and the stability of your distro will suffer the more you deviate from them.
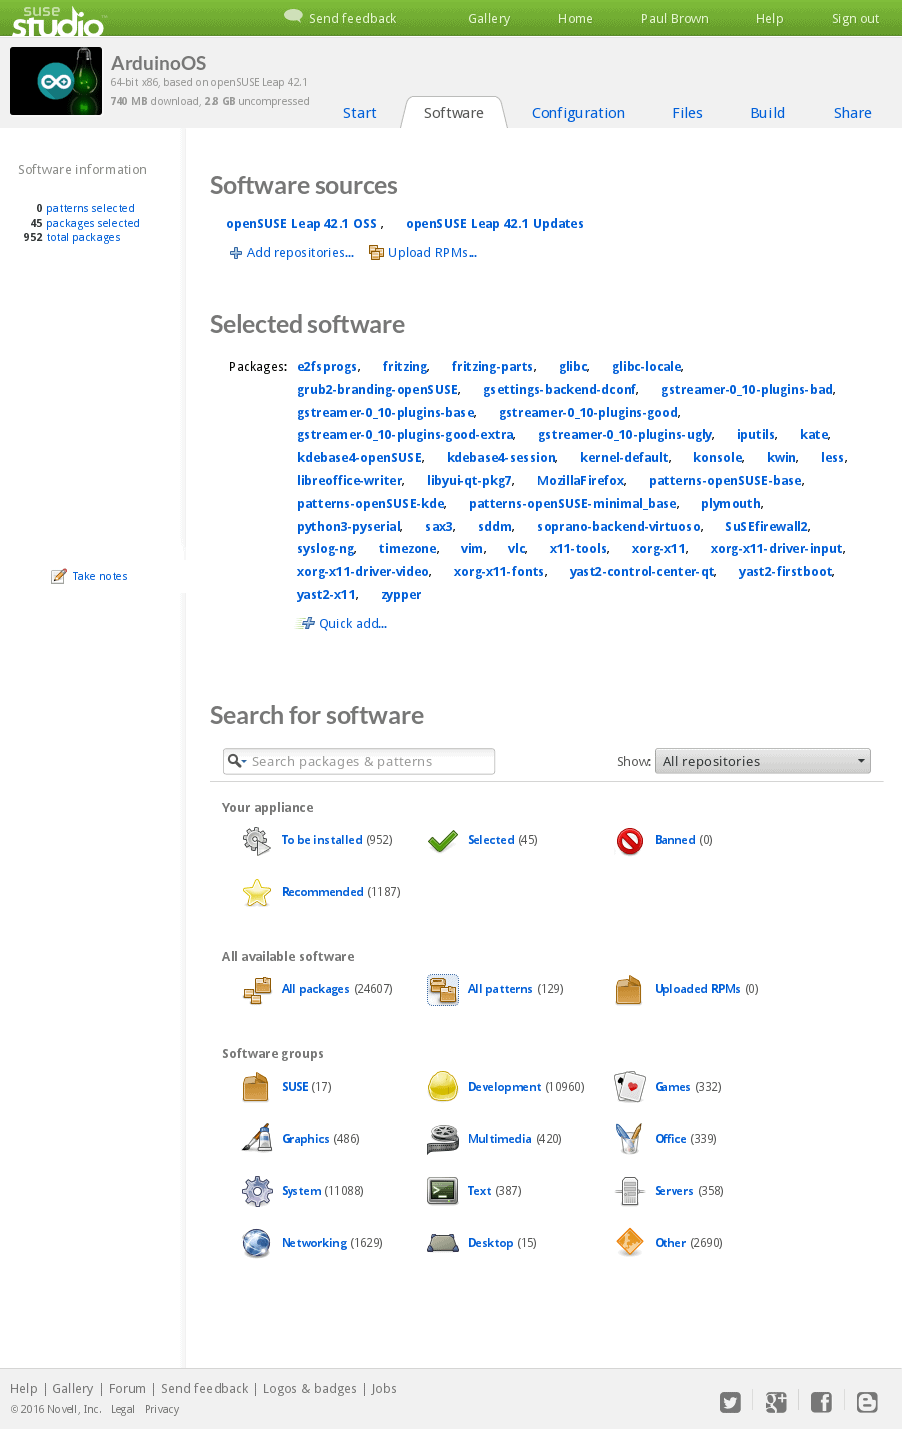
Add software that fits your needs.
That said, if you are considering building your own distro, chances are you already need some exotic stuff. You can add new repositories by clicking the Add repositories… link at the top of the page. My advice is not to go adding willy-nilly. Search for the repositories that contain the specific packages you need, check the version numbers in each (you will probably get more than one hit), make sure you find exactly what you require, and only then add the repository that looks best.
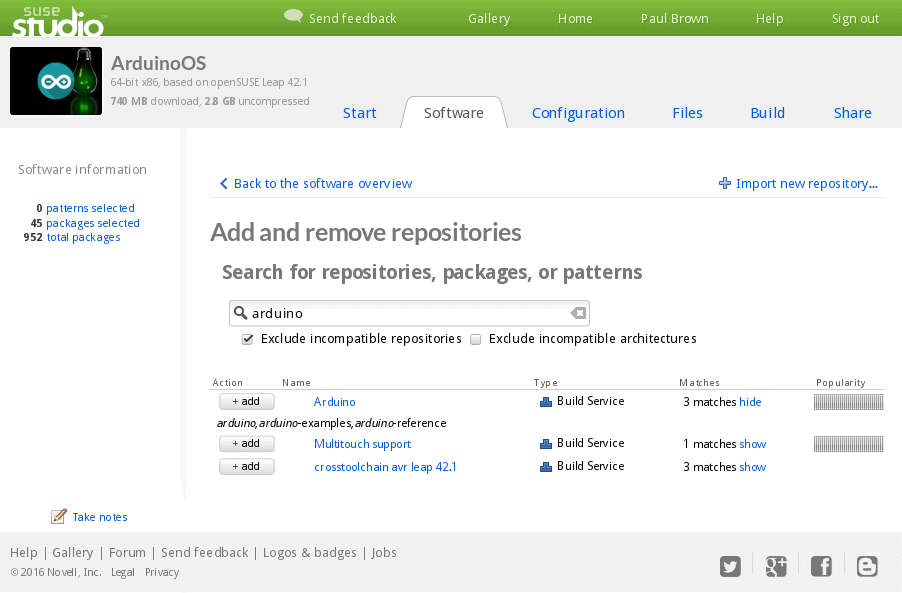
By adding more repositories, you can access more software…º
In my case, the Arduino IDE was not included in any of the default repos, so I went hunting for it in the non-default realm. A search for arduino turned up a repositoy called Arduino that contains the IDE, examples and reference manual. After adding the repository to my list, I selected the IDE and its accoutrements.
… Which you can then add to your project.
SUSE Studio will resolve all dependencies and add necessary packages (such as the OpenJDK Java package that the Aarduino IDE needs)… If it can.
It may happen that the software you have chosen has dependencies that spread beyond the base repos and the extras you have added. This is what happens with the Arduino IDE mentioned above. SUSE Studio complained it couldn’t find the avr-libc package in any of the available repositories.
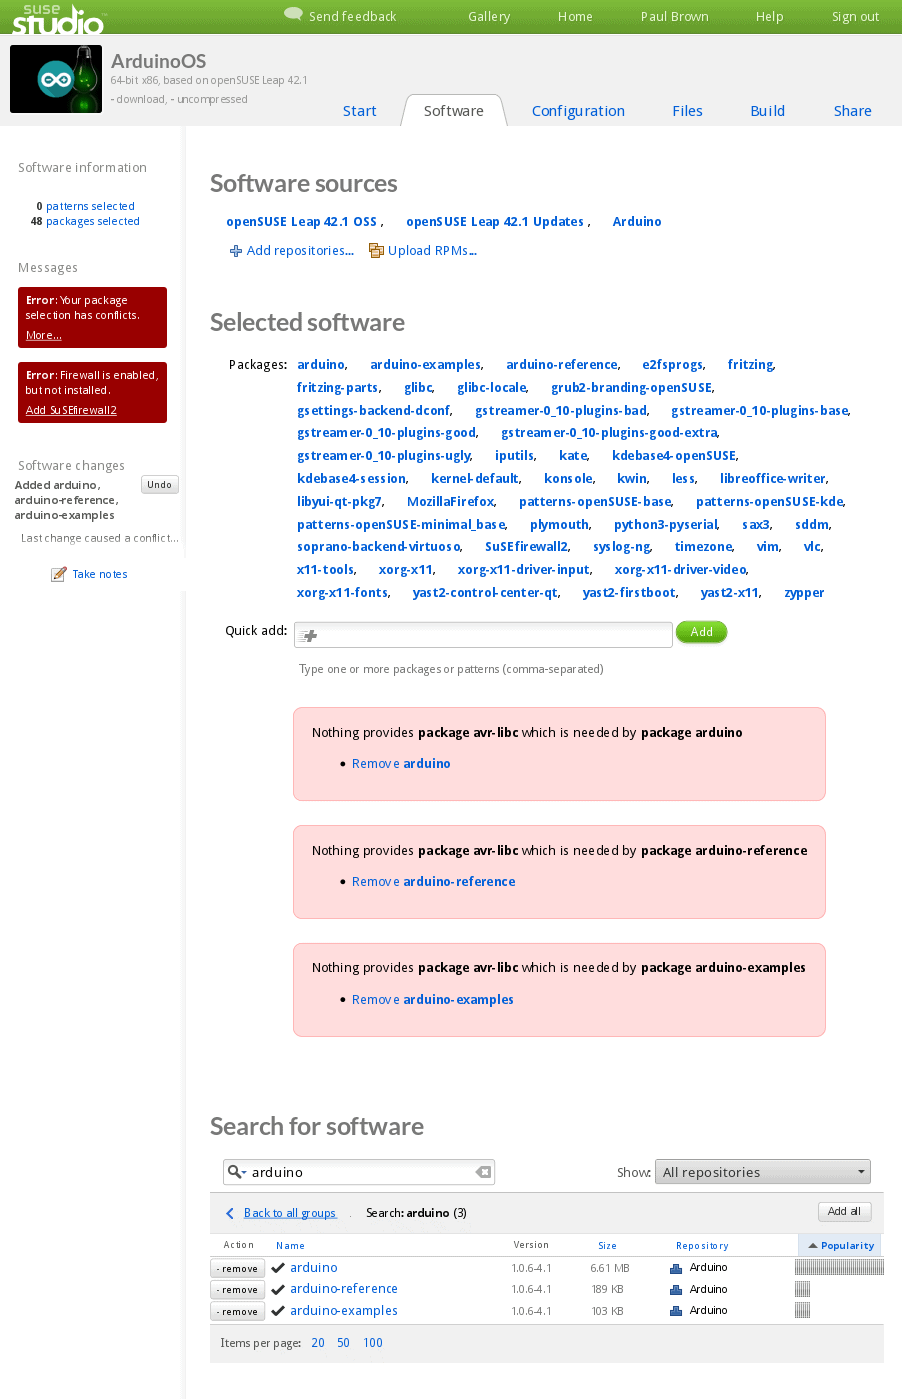
Beware of problems with dependencies. You may have to add more repositories to solve them.
The solution is simple: go back to Add repositories…, look for avr-libc, add the most promising-looking result and SUSE Studio will automatically add what it needs.
The students in our example would also need Fritzing, a graphic utility that allows you to design electronic circuits; and PySerial, a Python module that allows you to communicate (read data from and send data to) an Arduino over the USB cable, so those got added to.
We’ll be coming back to this section in a minute when we talk about fine-tuning, but let’s move on to the Configuration tab. Clicking on this tab brings up seven more sub-tabs. In General you can set up the default language, keyboard layout, and time zone for your distro. You can also configure the network, set up the firewall, and create users. I’m creating a student user and a teacher user.
The Personalize sub-tab is more about the graphical side of things. You can choose a logo and theme for your distro.
Under the Startup sub-tab you can decide what your distro will do once it has booted. I’m setting the runlevel to 5: Graphical Login.
I’m skipping the Server tab since I don’t need a database server.
Under the Desktop tab you can set up what user to auto-login with, if that is what you want. Since I want the least number of steps between the students and their tools, I’m configuring my distro to auto-login into the student account. I am also setting up arduino, the command that brings up the Arduino IDE, to autorun once the desktop loads.
Under Appliance you can set up your distro to be run in a virtual machine. I’m only going to touch one thing: I’m marking the Add live installer to CDs and DVDs which will add an installer to the distro’s toolset and allow students to install it to their hard disk.
Scripts allows you to create two scripts, one that will get run once the build is done, and the other every time the appliance boots. The latter includes a block that allows you to include code you want to run only the first time the appliance boots. I’m including the line
echo 'teacher ALL=(ALL:ALL) ALL' >> /etc/sudoers
in there, because I want teachers to have sudo privileges, but not the students.
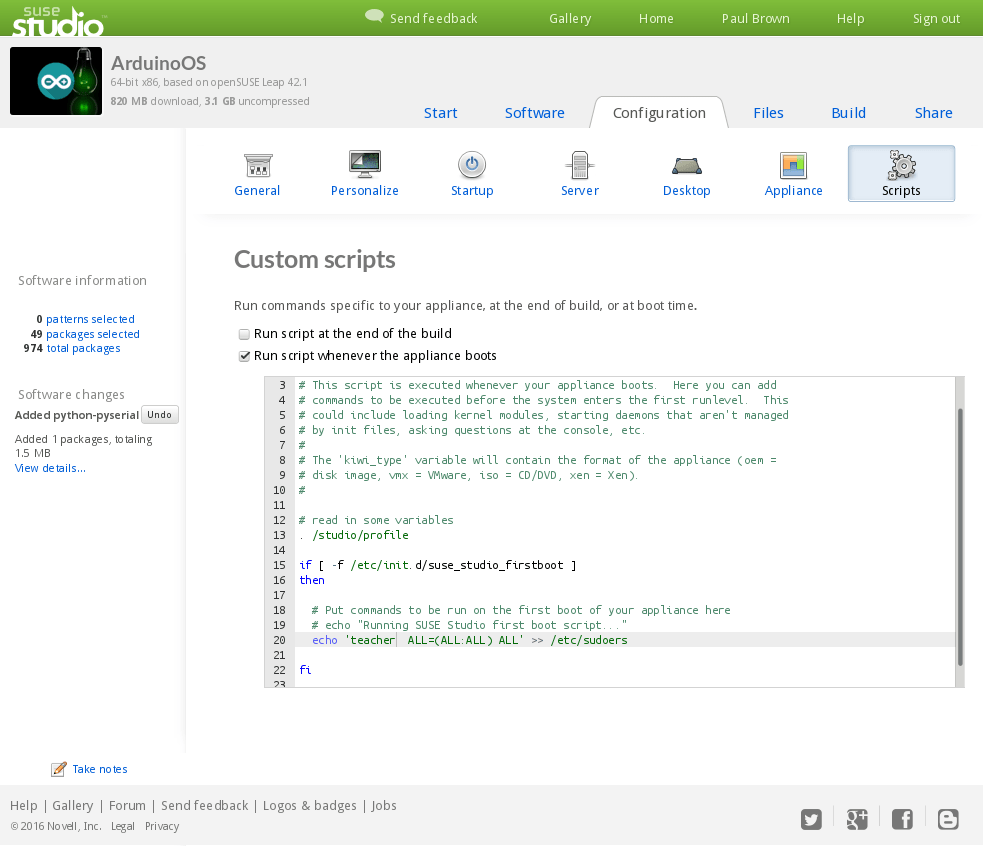
You can create a script that will execute when your distro boots.
Moving on from the Configuration tab, next up we have Files. In this tab you can upload files that will get added to the distro. You can also tell SUSE Studio where you want them in the directory tree. This is particularly useful because there are a couple of videos of projects I want the students to have to inspire them, but, even more importantly, there is a resistor color code guide that I use a lot that I think students will also find useful, especially once they have blown their umpteenth component to smithereens. There is also a guide to the Raspberry Pi’s GPIOs that might come in useful.
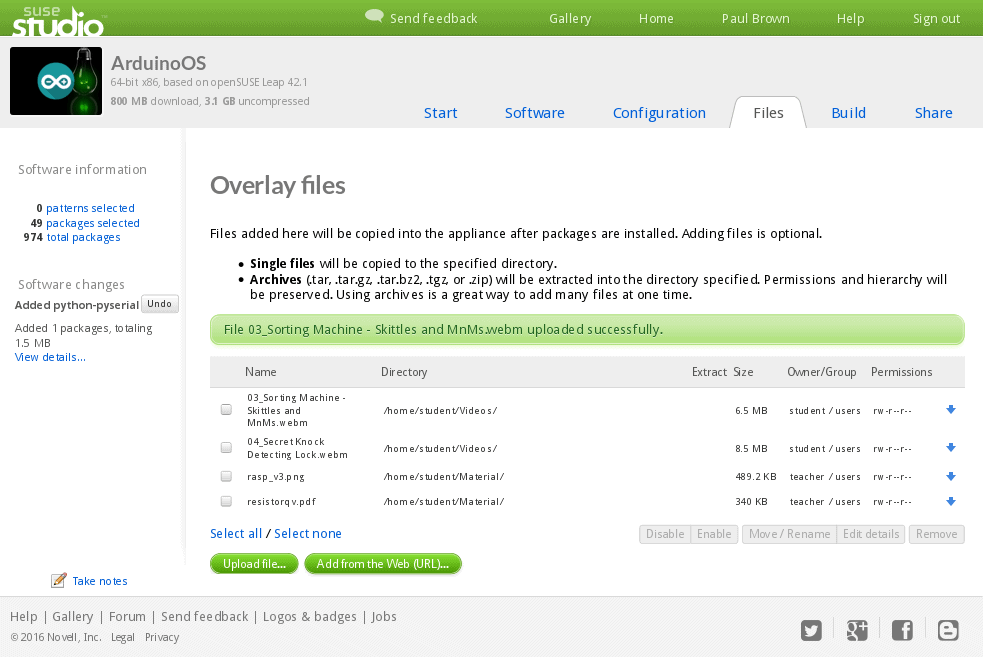
Add files you want users to have by default.
Finally we have the Build tab. Here you can choose what sort of image you want. In my case, I’m going for USB Stick / Hard Disk Image, but you can also generate an ISO image for a Live CD / DVD, an image for a local virtual machine, or one for a cloud virtual machine.
Hit Build and your image will be ready for download after some minutes (mine took about 13 minutes to build).
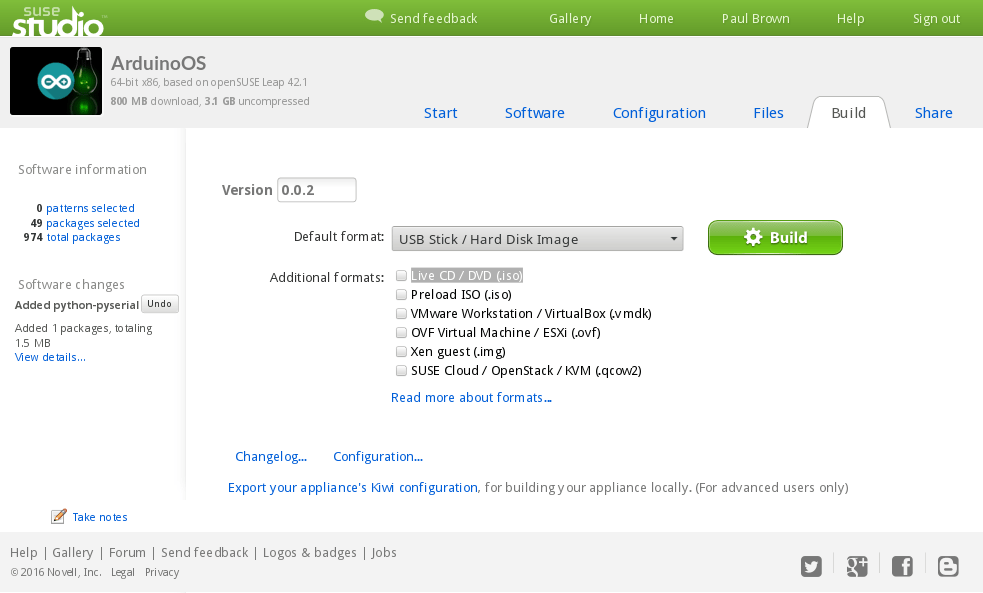
Choose the kind of system you want to build.
Trial Run
When it’s done, SUSE Studio provides you with a download link. Grab it and copy it to a USB stick to start testing. The system also offers a service that would allow you to try and run your appliance on an online simulator. Click on the Testdrive link next to the Download link and SUSE Studio will open an online virtual machine. Be warned that this requires Flash installed on your browser and it didn’t work well at all either on Firefox or Chrome. I saw the image boot but never reached a desktop. My guess this will work better with a text-only distribution.
You can also browse online the files included in the ISO image, which is fine to check everything is more or less as you want it. Again this didn’t work very well in Firefox, although it was okay in Chrome. However, this feature is of limited use beyond checking stuff, because you can’t actually interact with the files or change anything.
Your best bet to test your new appliance is still to download the ISO and run it from a USB stick.
Once the download is complete, uncompress it with
tar xvf your_distro_image.tar.gz
and you will be able to copy it to a pendrive with
dd bs=4096 if=your_distro_image.raw of=/dev/sdb
assuming your Linux puts your drive on to /dev/sdb. You can also use a graphical app like the ROSA Imager Writer if you prefer.
Once your stick is ready, plug it into to your test computer and boot. The first time your distro boots, it will take quite a long time to get to the desktop. That is because openSUSE does a lot of housework during the first boot. The bootloader, for example, extends the partition to make the most of the space on the USB stick. If, for example, the raw file you download is 3 GBs in size (as mine was), and you copy it onto an 8 GB stick, the bootloader will inflate the distro’s partition to take up the empty space and give you more storage room.
The thing to remember is to be patient and let it do its thing. The following boot times will be much shorter.
Retouching the Image
Note that first tries are rarely successful. Usually you’ll get more or less what you want on the third or fourth try. Then your users will weigh in and you’ll probably have to modify your distro further. In my case, for example, MP4s videos didn’t play in VLC. Not a biggie: the videos I had uploaded where in webm and they played just fine, and I was keen the students only use open formats anyway. I had also forgotten to include an app that would open images and PDFs. I could solve that with KDE’s Gwenview to view graphics, and Okular for the PDFs.
I also discovered that sudo is not installed by default, so my specifically modified the first boot section, the one that included the teacher user in the sudoers file, was not really very useful.
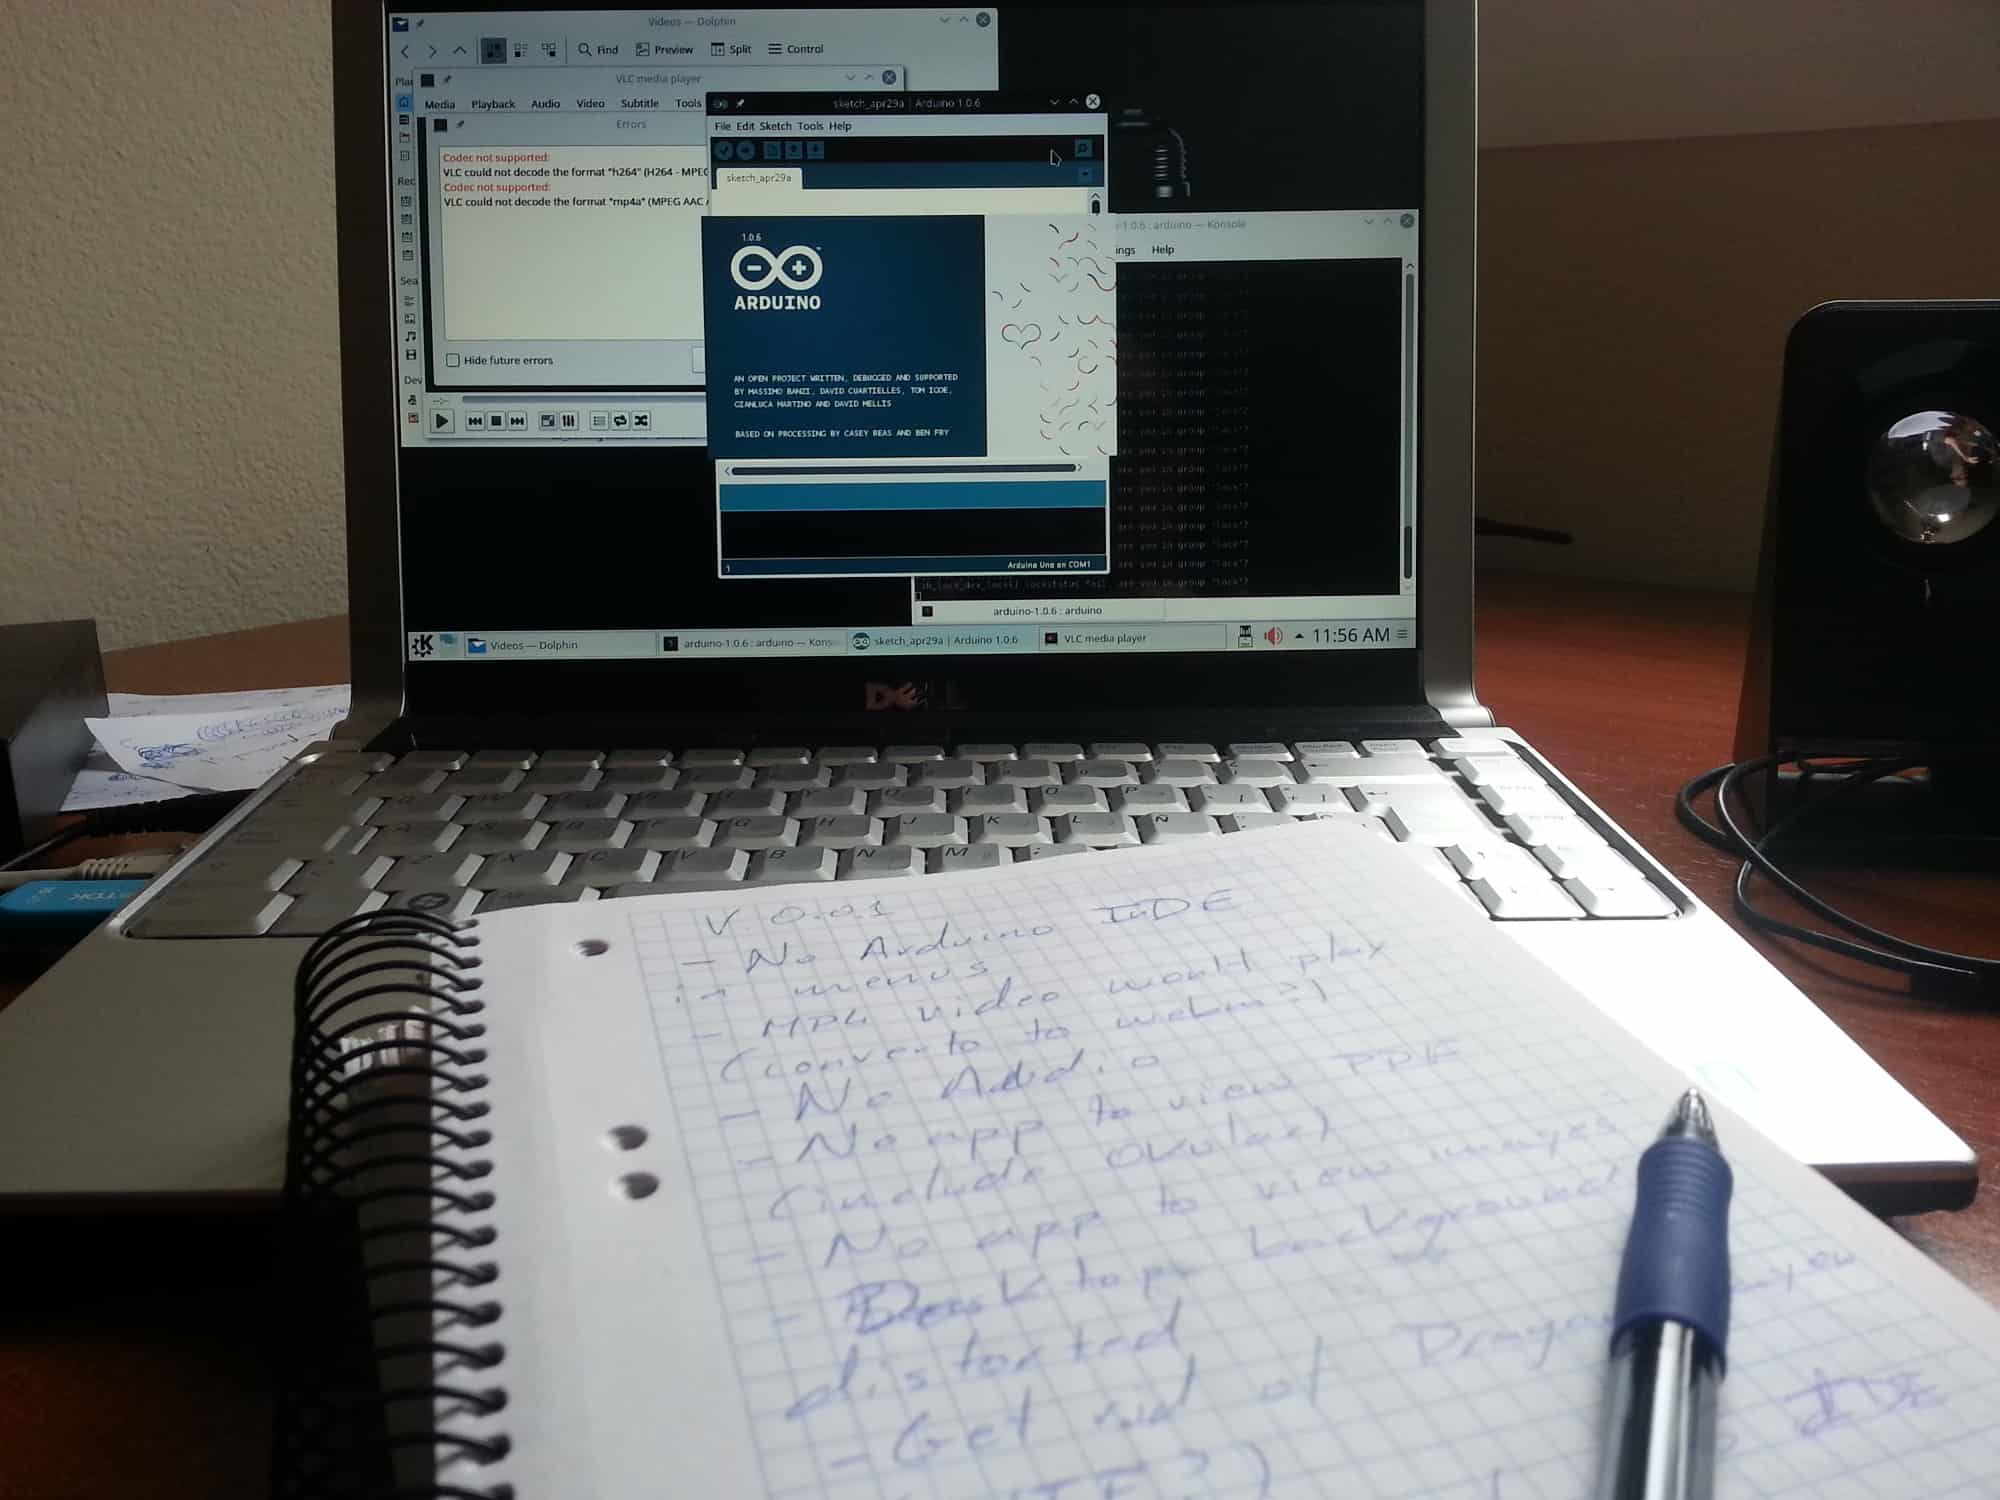
First time boots are rarely completely successful.
There were also a number of packages I would want to get rid of: clicking on a video brought up something called Dragonplayer instead of VLC. It didn’t work, so it would have to go to avoid confusing the users.
The default install also drags in the Qt development environment. Another thing to jettison.
Then there are mild annoyances, like the Arduino IDE doesn’t show up in the menus. If you close it and have to open it again, you have to do so from a shell or KDE’s launcher ([Alt] + [F2]). What is more serious is that the version of Arduino supplied by the Arduino repository we used above is 1.0.6. Unfortunately, there are some newer boards (the Arduino 101 comes to mind) that are only supported by the latest versions of the IDE, at the moment of writing, that is version 1.6.8.
Some of the above issues are more easily solved than others. Making a menu entry for the Arduino IDE is relatively simple. All you need to do is open the Files tab in SUSE Studio and add an arduino.desktop file into the /home/student/.local/share/applications/. The file could look something like this:
[Desktop Entry]
Version=1.6.7
Type=Application
Terminal=false
Name=Arduino IDE
Exec=/usr/bin/arduino %U
GenericName=Development Environment
Comment=The integrated Development Environment for Arduino boards
Icon=Arduino
Categories=Development;
Then find yourself a an Arduino icon you like, make sure it is a PNG (convert it if not), rename it to Arduino.png, and, again under the Files tab, add that to /home/student/.local/share/icons/.
In the next iteration, this had messed up the permissions to /home/student/.local/, assigning ownership of the directory to root. This in turn caused KDE to throw a hissy-fit. No problem: modifying ownership from the first boot code we saw above made everything okay again (see below).
Another glitch was that the teacher user had to input root’s password to use sudo. This kind of defeats the purpose of sudo altogether. Including a couple more lines into the first boot code that overwrite the default /etc/sudoers file did the trick. The first boot section in the boot up file ended up looking like this:
if [ -f /etc/init.d/suse_studio_firstboot ]
then
  # Put commands to be run on the first boot of your appliance here

  # Setting up sudoers
  echo 'root ALL=(ALL) ALL' > /etc/sudoers
  echo 'teacher  ALL=(ALL:ALL) ALL' >> /etc/sudoers

  # Re-setting permissions fo students' directories
  chown -R student:users /home/student/
  chown -R teacher:users /home/student/Material
  chown -R teacher:users /home/student/Videos
fi
Nixing the pattern-openSUSE-kde metapackage gets rid of some of the unnecessary KDE packages, but also disappeared Dolphin, KDE Plasma’s file browser. I had to re-add it by hand.
Finding an up to date version of Arduino was also tricky.
Before we continue, bear in mind that SUSE Studio is really a part of several services that SUSE has created to manage their own distributions and repositories. Another of these services is the openSUSE Build Service (or OBS for short). OBS is a bit like Launchpad for Ubuntu: a place where developers and packagers can upload software that is not in the official repositories, or more modern versions of software than what you can find in the official repositories.
A search through OBS using the keyword arduino led me to Klaus Kämpf’s repository and Klaus is packaging the updated versions of the Arduino IDE.
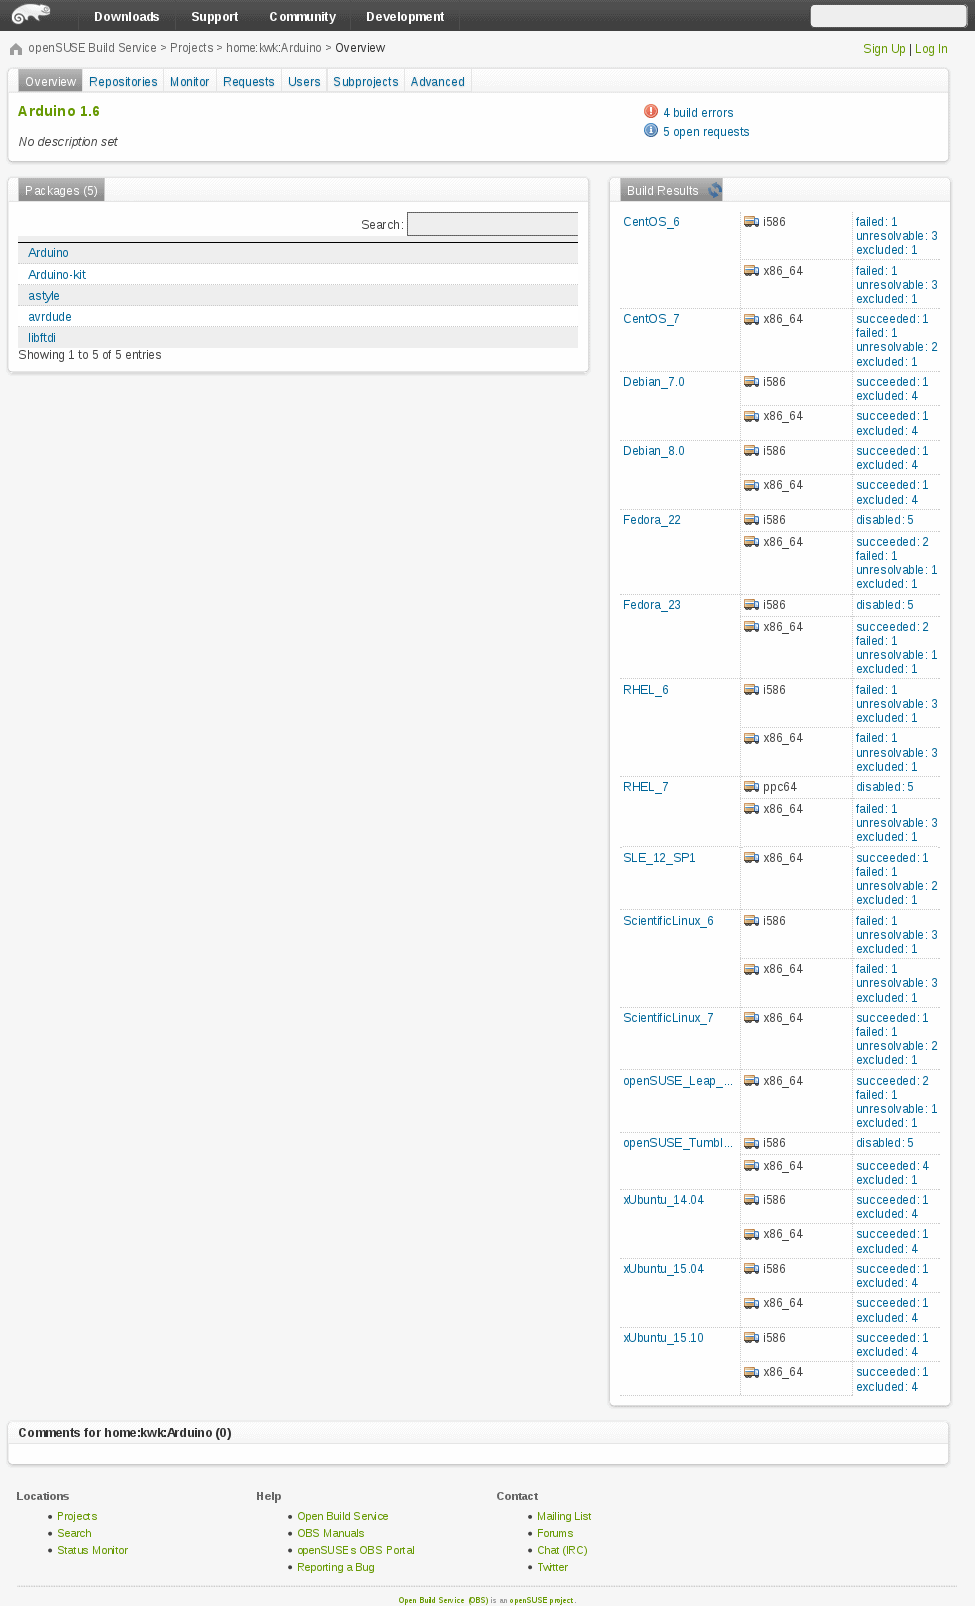
You can add personal repos (similar to Ubuntu’s PPAs) to SUSE Studio and then use them in your project.
You can add a new repository to SUSE Studio’s roster of repositories by clicking on Add repositories… from the Software tab, and then clicking on Import new repository…. By entering “ home:kwk:Arduino” into the Project name: text field, the repository is imported into SUSE Studio for everybody to use. It will also automatically be added to the list of repositories available for your own project.
Another way of adding non-listed software is by uploading or linking to an RPM directly… like this one. This is a bit risky and you will have to resolve conflicts and dependencies by hand, and the package will not be updateable, but it may work.
You could also create your own repository on OBS, but that is material for another article.
Finally, you could modify the image once you have downloaded it. You could mount it with the -o loop option and then chroot into it… but, again, this seems like material for another article.
As you can see, even if SUSE Studio doesn’t stock by default what you need, there are always plenty of ways of overcoming its limitations. One of them is sure to work for you.
Conclusion
If you are considering creating a tailor-made distro, SUSE Studio is quite user friendly, in that you can be up and running in minutes; it is versatile in that it allows you to add packages from external repositories or even allows you to upload your own RPMs (at your own peril); and quite forgiving in that, if you mess up, you can still go back and rectify, or even roll back your changes to a prior version that did work.
Having said that, building a distro is a bit of a balancing act and getting it right takes patience and quite a bit of trial and error, despite all the help SUSE Studio offers.
The payback is worth it though.
Cover image by stux for Pixabay.com.
[sharedaddy]