How easy is it to edit video on a GNU/Linux system using free software? Can the likes of Kdenlive, or more specialised tools like Blender and Natron, win users over from Premier, Movie Maker, or Sony Vegas? I tried to carry out what at first glance seemed a simple video editing task using three Open Source video editing programs and this is how I fared.
To gauge the state of video-editing on GNU/Linux, I decided to set myself a challenge and try solving it using only Open Source software. I wanted to see not only if Linux had the tools fit for the task, but also what the learning curve for each app was like.
The Challenge
The challenge I set myself was seemed simple enough: using three (initially four) widely available FLOSS apps, create a 20-second or so, one shot video, which consisted of a static background (it could be a moving background, it makes no difference), in which I had to open three “windows”, each showing different movie playing through them, something like what you can see below.
![The challenge: Create a video of a static or moving background (the technique should allow both) with three windows each showing a different movie playing within them. You can only use Free Software that work on a free OS. The videos I chose also happen to be free, by the way -- from left to right, Blender Foundation's Big Buck Bunny [https://peach.blender.org/], Sintel [https://durian.blender.org/], and Tears of Steel [https://mango.blender.org/].](http://www.ocsmag.com/wp-content/uploads/2015/12/fig01_template.png)
The challenge: Create a video of a static or moving background (the technique should allow both) with three windows each showing a different movie playing within them. I could only use Free Software apps that work on a free OS. The videos I chose also happen to be free, by the way — from left to right, Blender Foundation’s Big Buck Bunny, Sintel, and Tears of Steel.
I was left with Kdenlive, Natron and Blender and to avoid making one, very long and meandering article about my quest to complete the challenge, I have split the whole thing into three articles, one per app.
As my impression was that Kdenlive would have the gentlest learning curve, so I started with that and here we are.
Kdenlive
Transitions vs. Effects
In Kdenlive, transitions, although originally designed to cut from one clip to another, are now used as means to combine two clips on different tracks in different ways . Effects, on the other hand, tend to affect only one track.
Another interesting difference is that, although you can pile effects one upon the other creating a stack of effects, transitions can only be used one after the other and can never overlap.
You can access both, by right-clicking on a clip when it is out on a track in the editing area, and picking either Add Transition, or Add Effect from the contextual menu.
Yes, Kdenlive is quite intuitive to use: you can drag, drop, cut, and pull clips; right click brings up contextual menus from which you can choose transitions, effects, and more. However, there is not a simple solution for what I intended to do.
After quite a few false starts, I came upon a tutorial by Seth Kenlon in which he explains how to use masking in Kdenlive. Thanks to Seth’s article, you can learn how to open one (1) window using masking techniques. This set me on the right track, but combining more than two clips requires one more ingredient that you’ll learn about later.
Seth explains that, apart from the two clips you want to combine, you need a mask clip. In most cases, this is simply a PNG with an alpha channel (i.e. a transparent area). For the challenge you need a PNG of a black rectangle on a transparent background. To make life easier for yourself, make sure the background is the same size as a frame of your movie. If you’re using 720p, that means the image must be 1280×720 pixels.
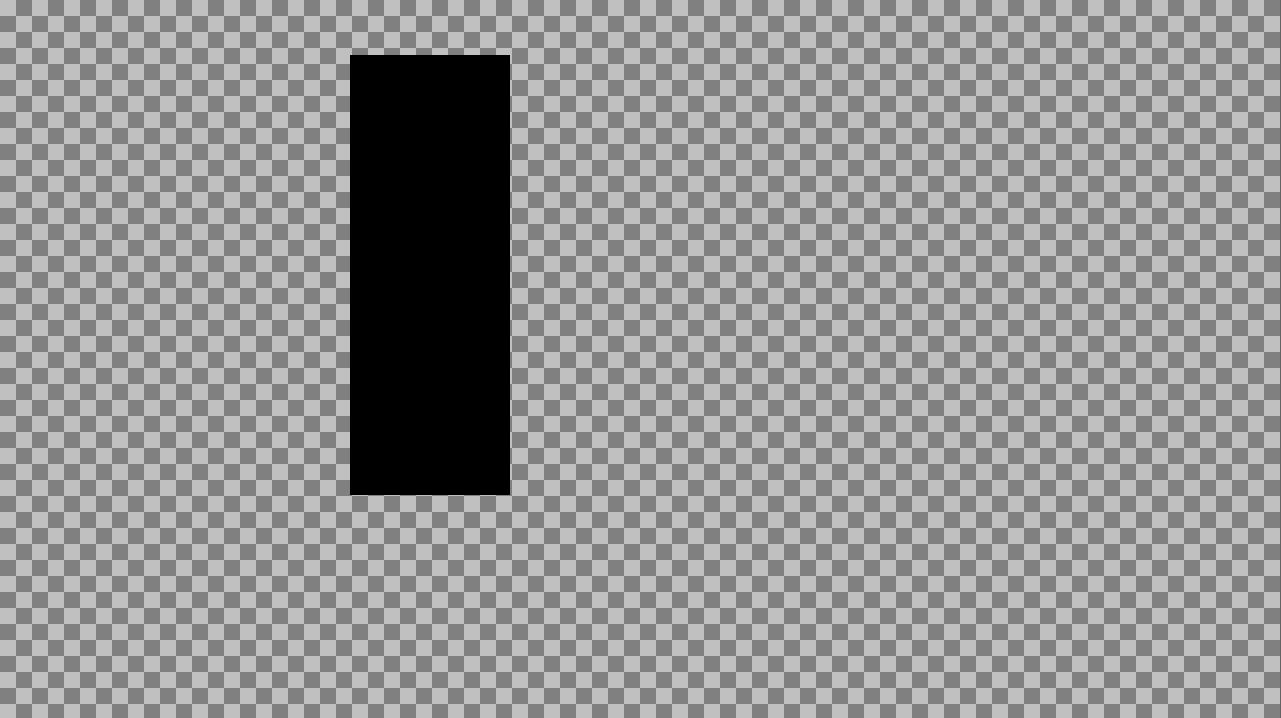
For this task, you need a mask which consists of a rectangle on a transparent background. The size of the whole picture, i.e. the black rectangle on the transparent background, is the size of a frame in the finished movie, in my case 1280×720 pixels, that is, 720p.
You can draw your mask using Inkscape and exported it as PNG. When you’ve got it, import all your elements into Kdenlive. You need: the background image, the movie that you’re going to show through the window, and the mask.
First drag the movie to the third track in Kdenlive’s editing area. Then drag the the mask to the second track so it is immediately above the movie. Pull the right edge of the mask clip to make it as long as the movie clip. It should look something like what you see below. In the latest versions of Kdenlive, the program automatically applies a Composite-like transition to clips that have alpha channels (i.e. contain transparent regions), so whatever is below will show through.
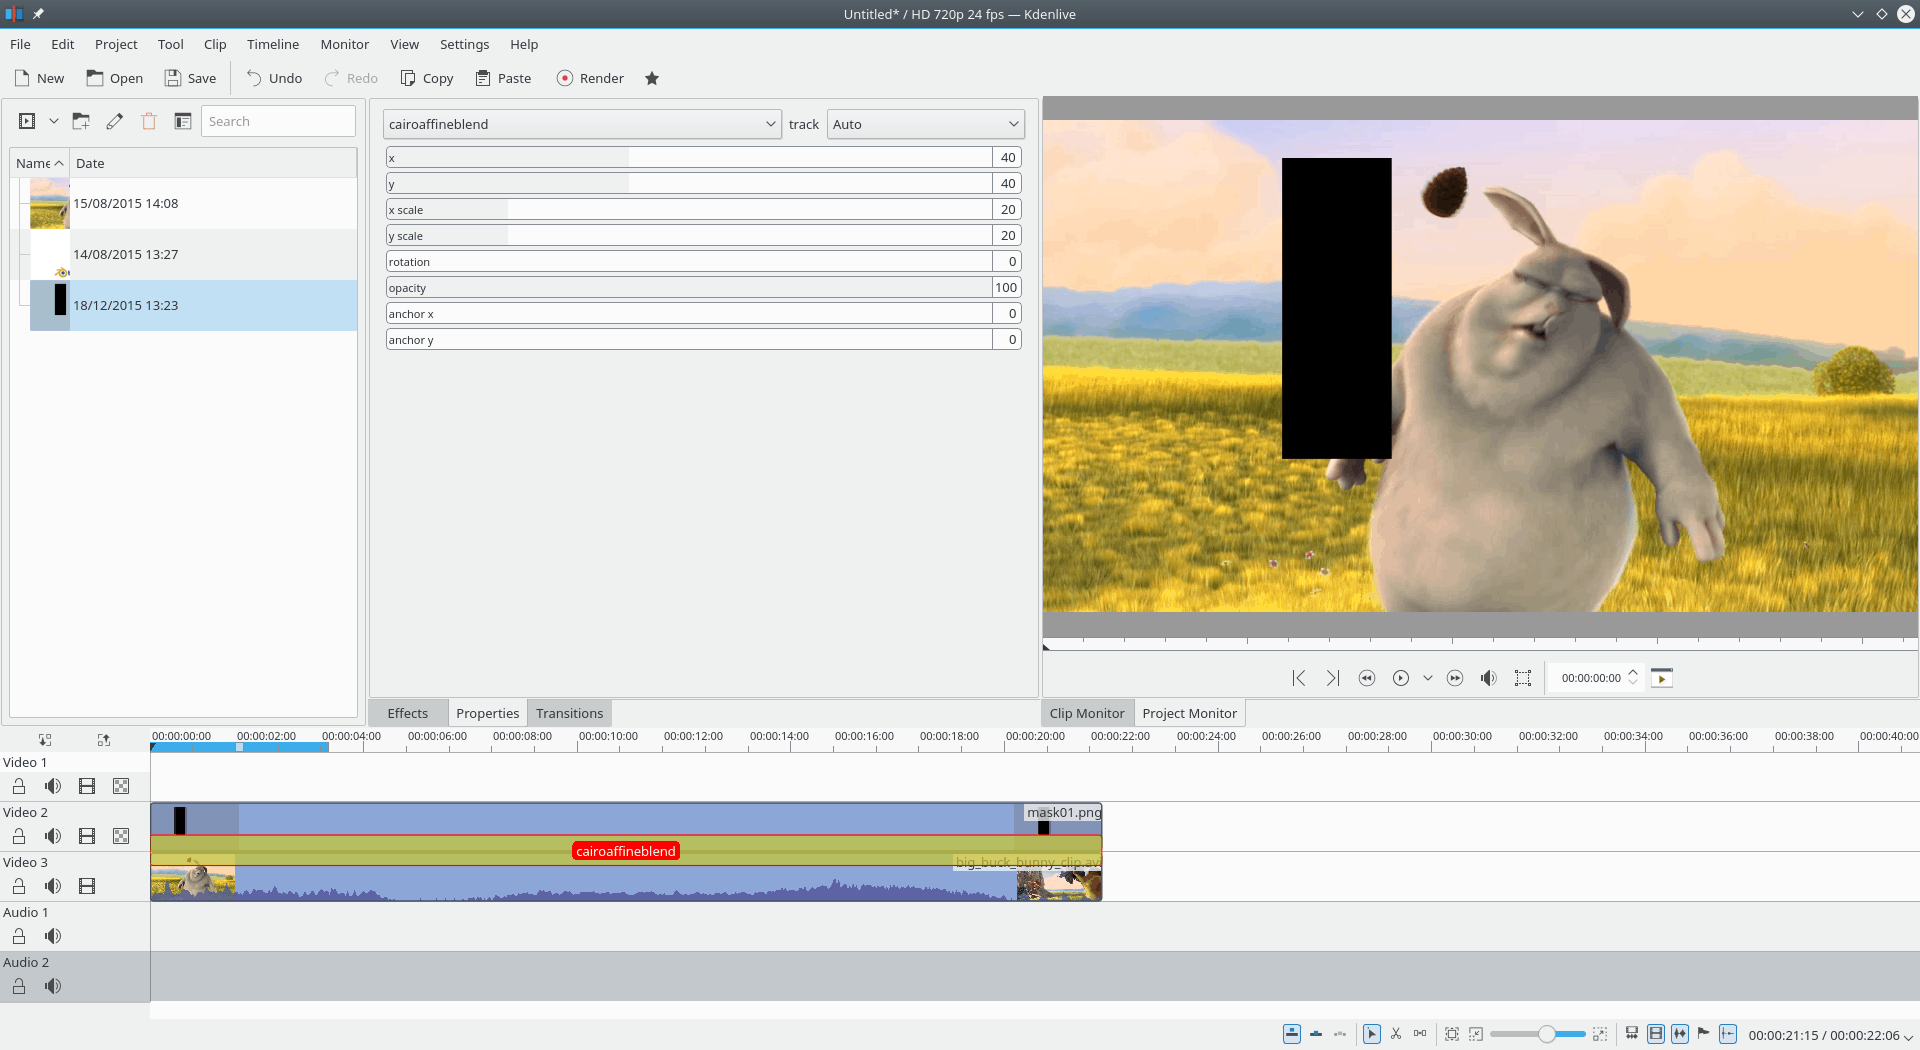
Make sure the mask clip is in a track above the movie clip and pull it so it is as long as the movie clip. Combine both clips with a cairoaffineblend transition.
But, for what we have in mind, the default composite transition (that you can turn off in the box at the beginning of the track) isn’t going to cut it. Right click on the mask clip, choose Add Transition > cairoaffineblend.
The result of the above is that you will be able to see the movie with a black rectangle (from the mask layer) over it. You may be thinking that that is exactly the contrary of what you want, that what you want is to block out all of the frame except the rectangle.
But here’s where it gets interesting: drag out the background picture and place it on the first, uppermost track, immediately above the mask. Now add an alphaxor transition (Add Transition > alphaxor) between your background picture and your mask and drag the right edge to cover the whole full length of the clips.
Hey presto! The underlying movie will show through a rectangular window (as defined by the mask layer) as you can see in the picture below.

By combining cairoaffineblending and alphaxor with a mask, you can have a clip show through an opaque layer.
To understand what’s going on here, you have to understand how an XOR operation works on alpha channels. The alphaxor transition xors the pixels from two layers and makes them transparent (i.e. applies alpha) only if neither are transparent to start with.
The top, background layer does not contain any transparent pixels. In the mask layer, only the black rectangle contains opaque pixels, so that’s where both layers get there pixels made transparent, letting the third, lowest layer, the movie layer, show through.
Seth’s tutorial ended there. I was left with the task of figuring out how to do the same thing using multiple layers and masks.
I discovered that by alternating the cairoaffineblending transition, masks and the alphaxor transition, it is possible to have several layers of movies show through each other from bottom to top, as you can see below. However, you do need an extra mask layer, what we you could call a master mask, a mask that is the sum of all the other masks combined. You alphaxor the master mask with the top, background layer.
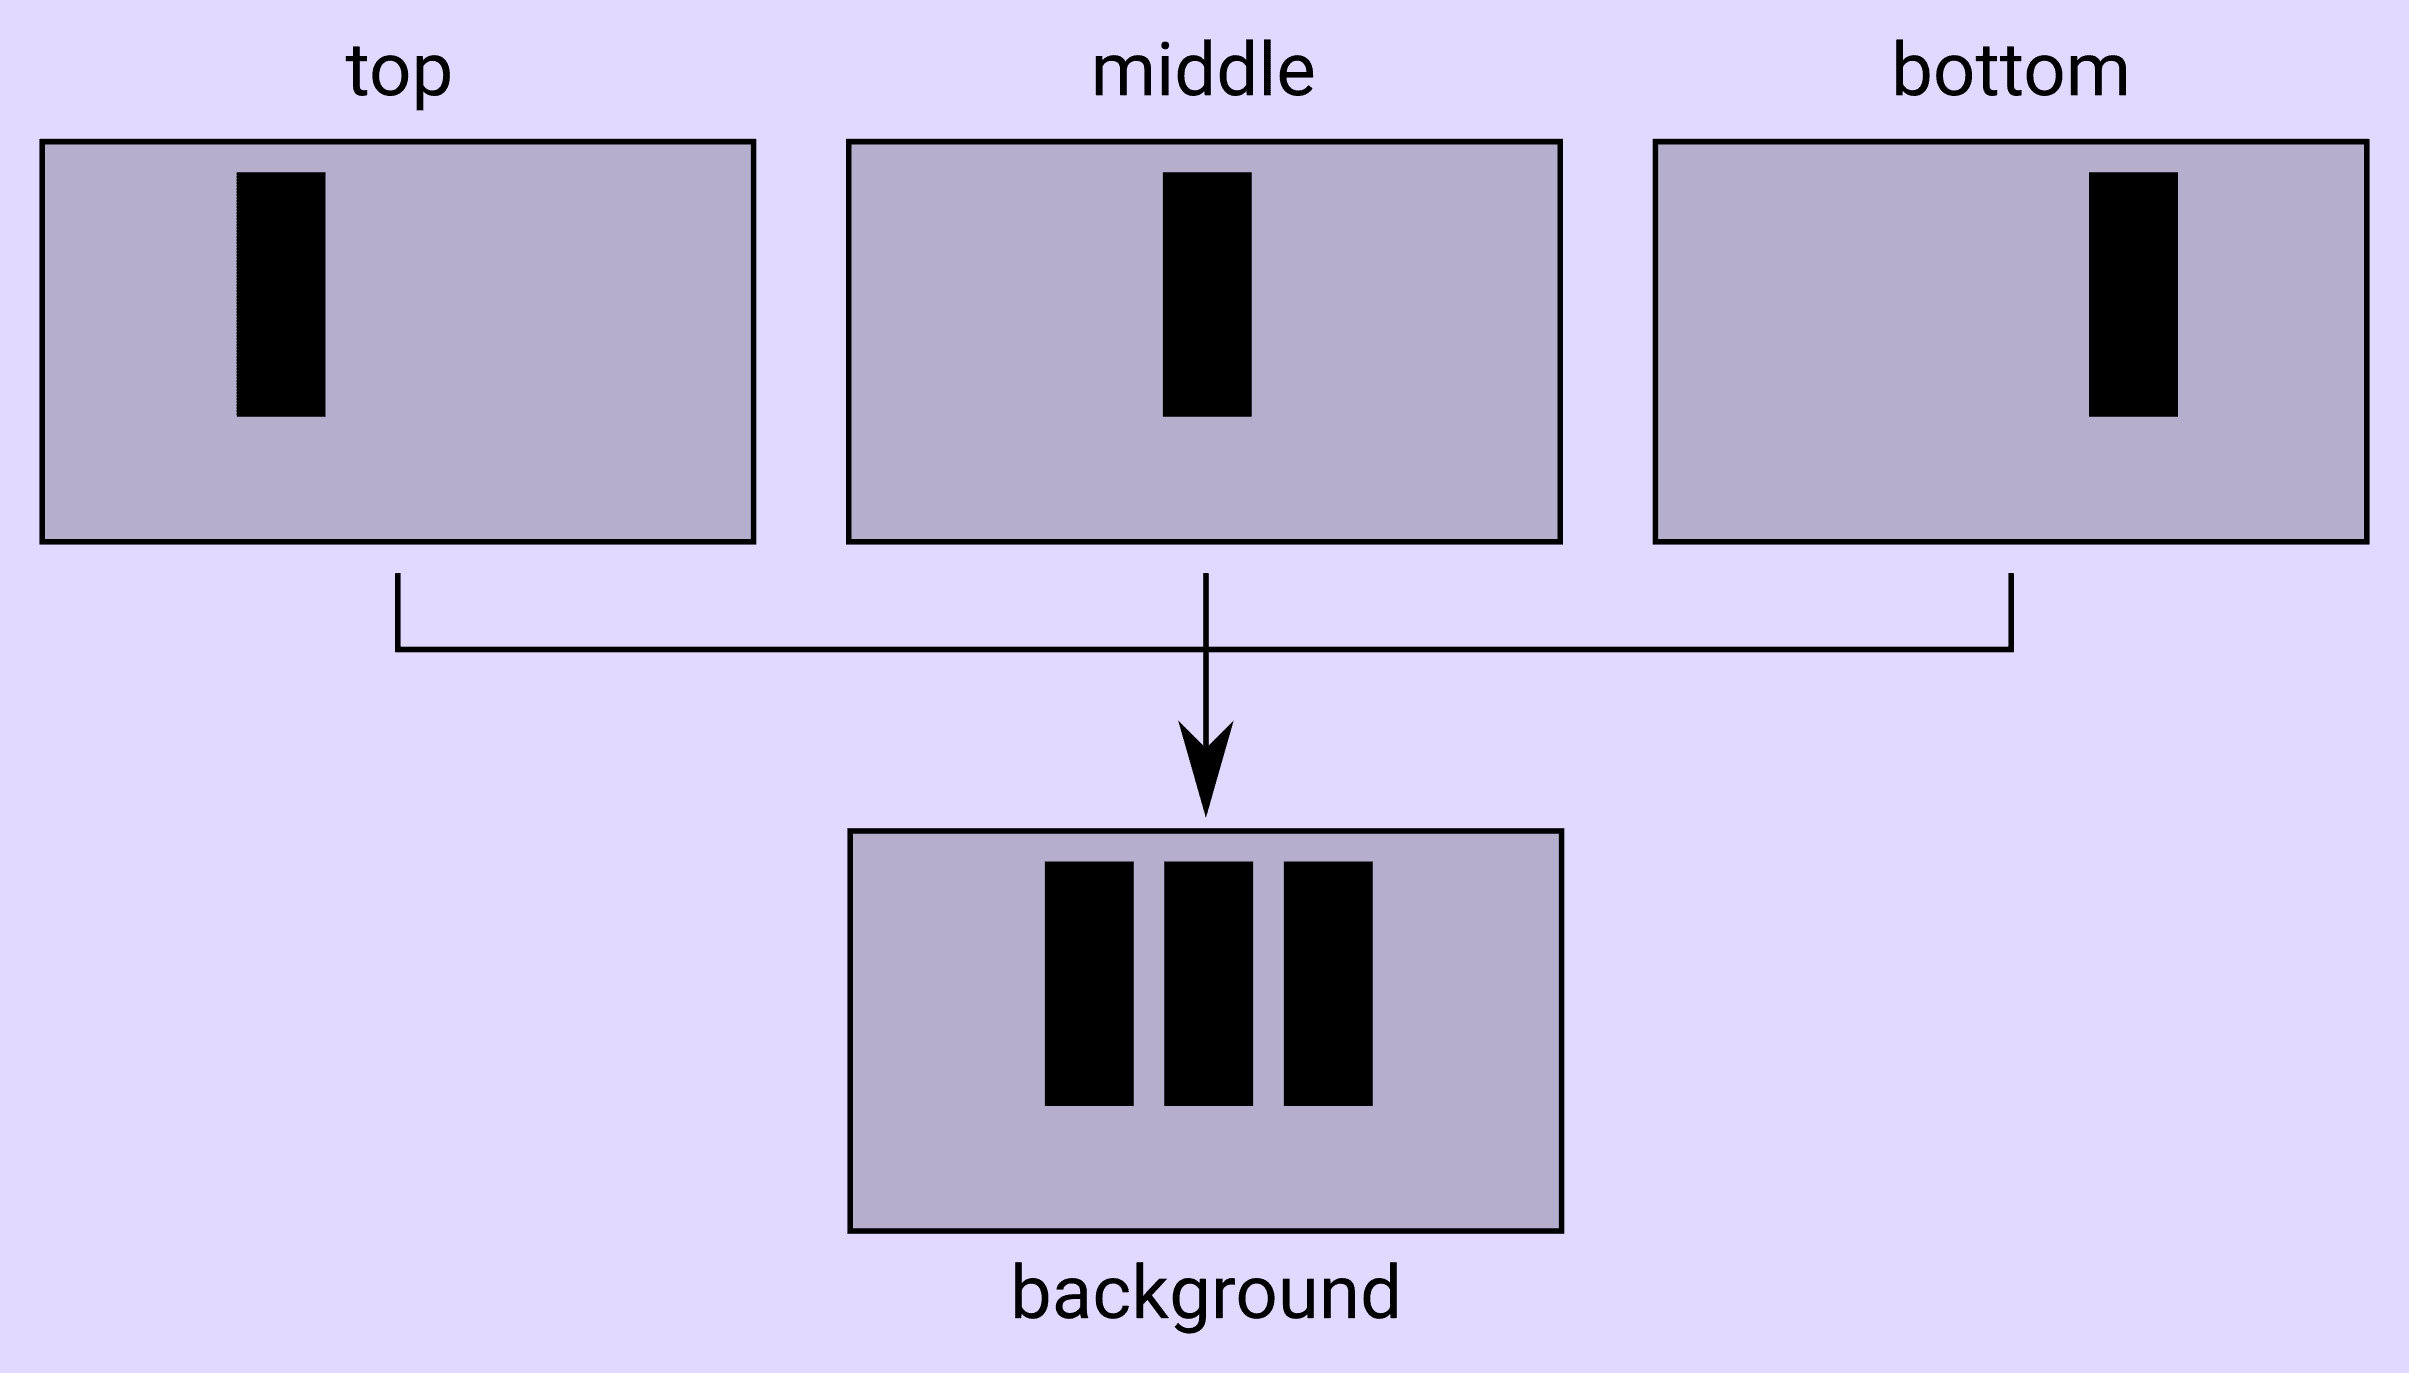
Combine all your masks to make a master mask to punch holes through the top, background, clip.
You then alphaxor all the combined lower layers with the top two levels and all the movies show thorugh-
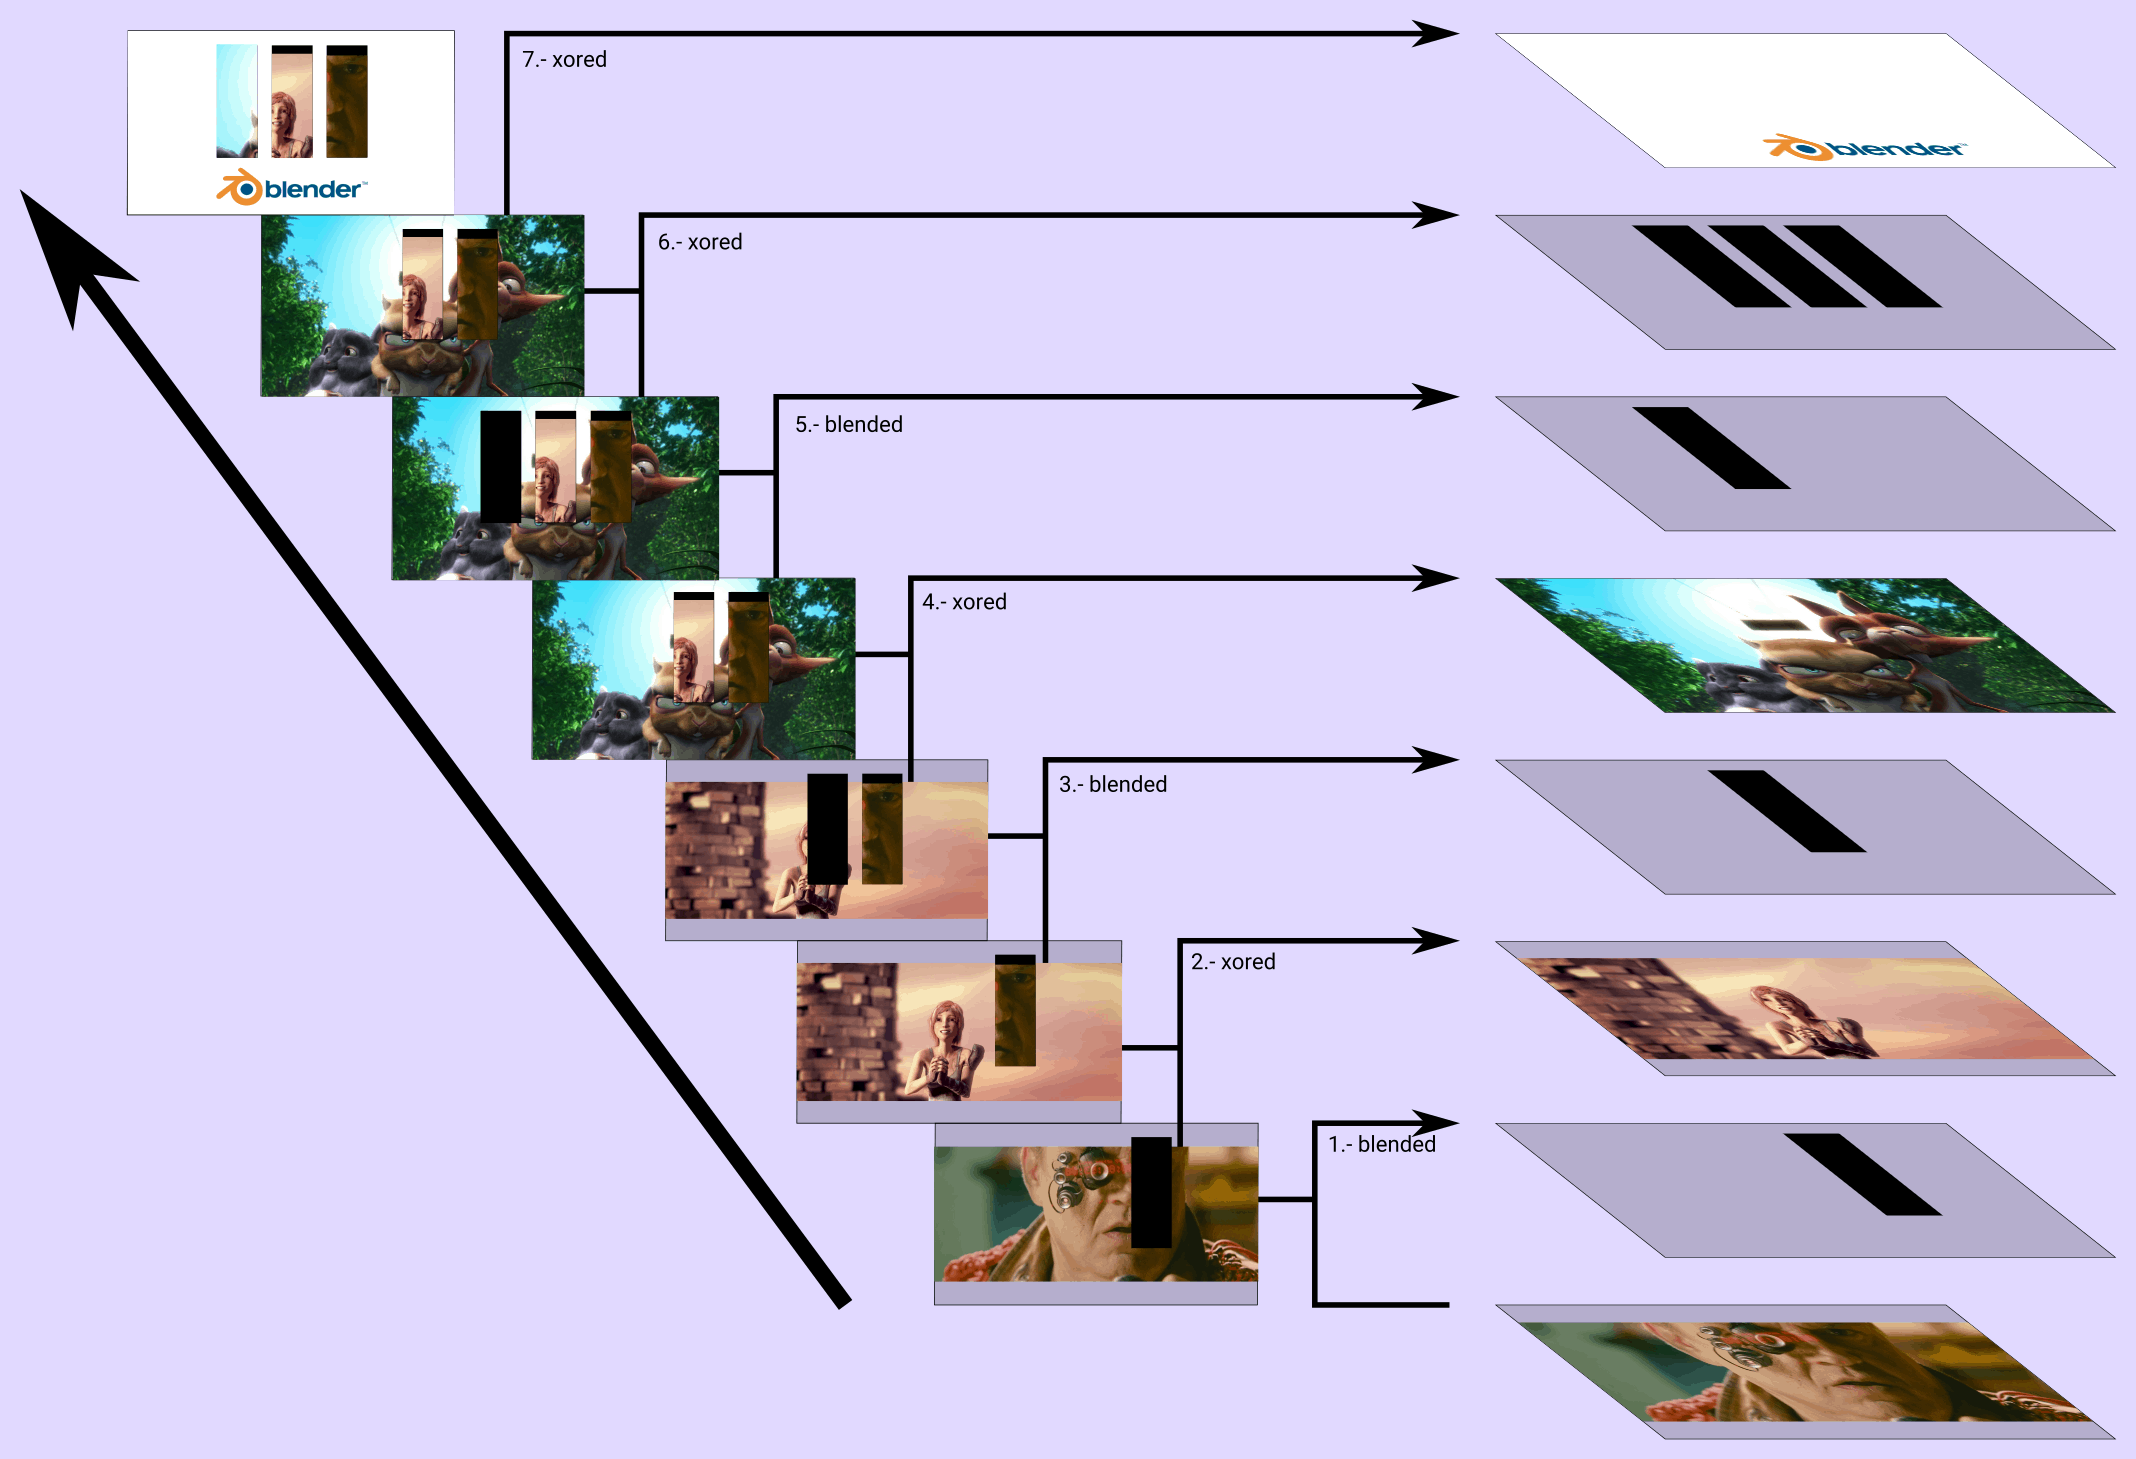
Blend and XOR your clips and masks from bottom to top to achieve the “multiple windows” effect. Add in the master mask between the clips and the background so the movies show through.
And here’s the proof it works:
Making it Prettier
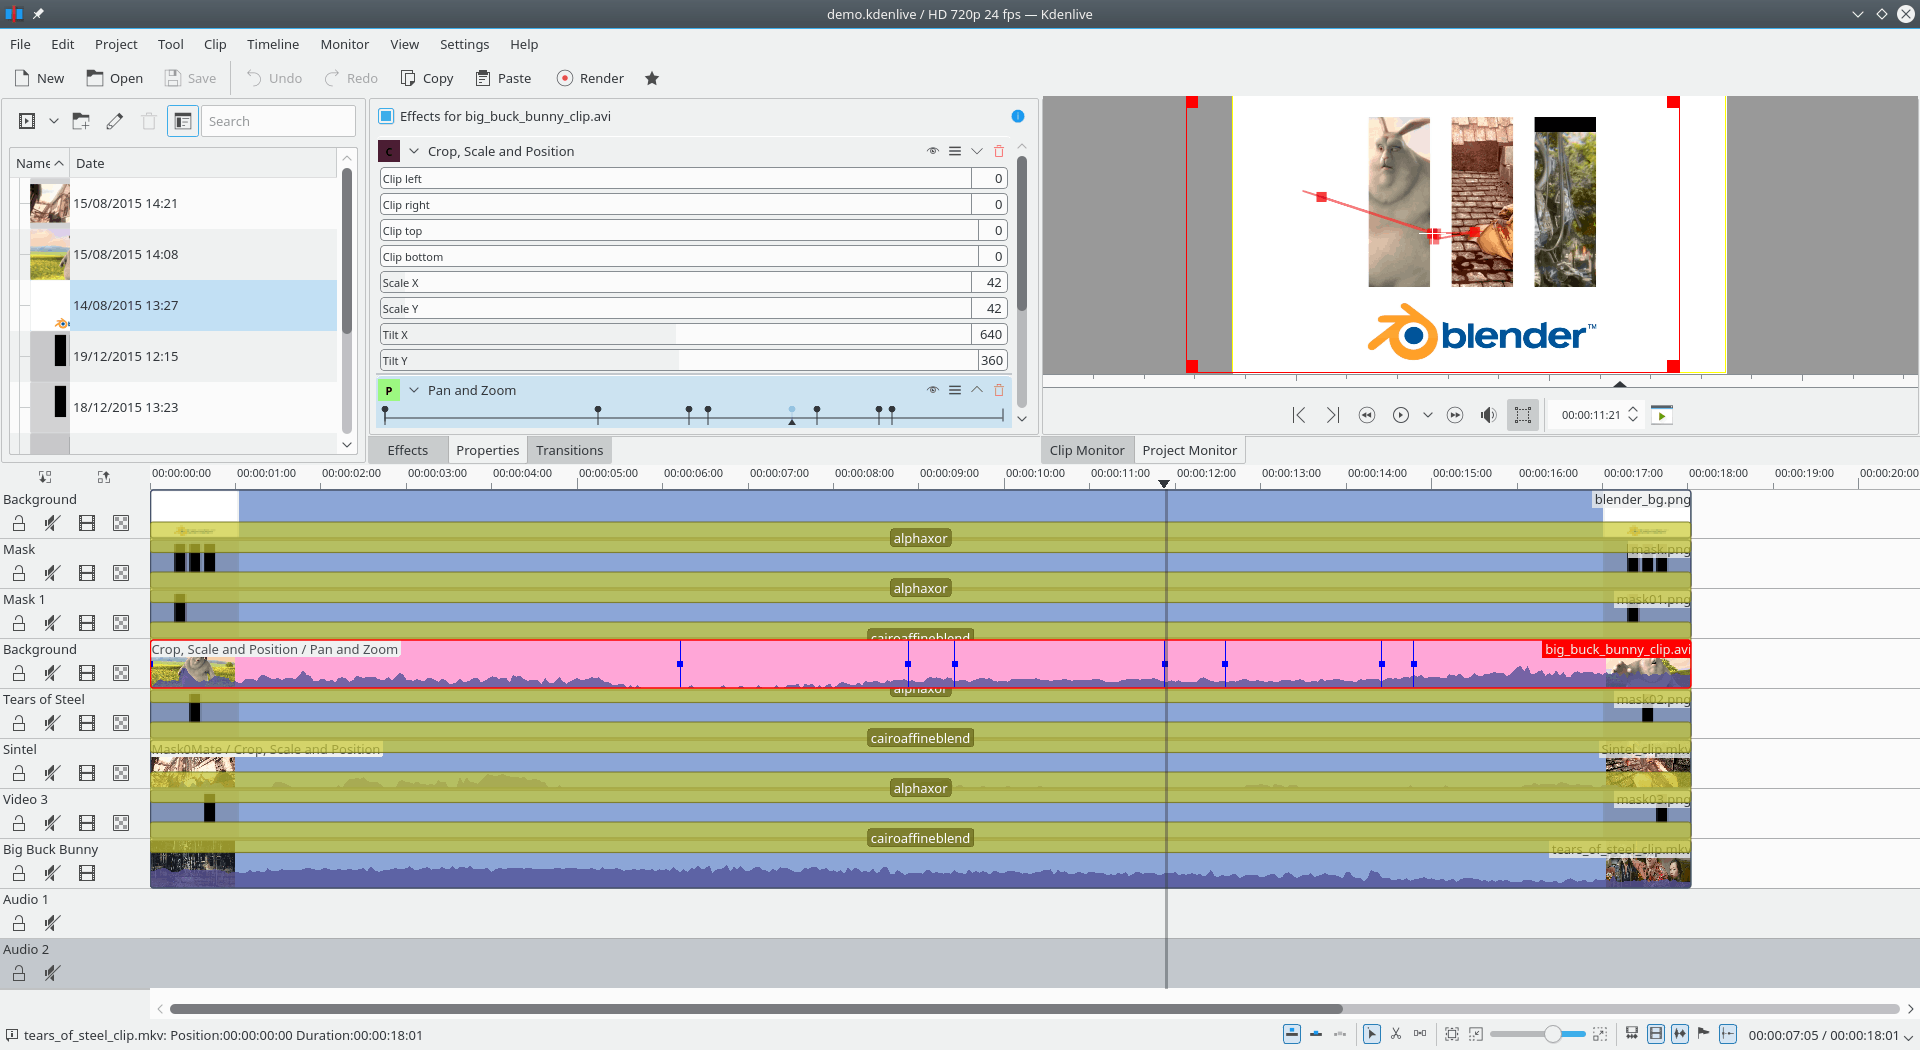
To make you video look better, you may want to resize your clips so you don’t get black areas from videos that use a panorama “letterbox” format showing through your masks. To resize your videos, right click on the clip you want to modify, and choose Add Effect > Crop and transform > Crop, scale and position. Adjust the sliders until you get the size and positioning you need.
You’ll also have to fiddle with the clips’ audio tracks, or you’ll have this horrible cacophony of mixed sound tracks coming out of your loudspeakers. Not nice.
Another enhancement would be to use animated masks, masks that move around or zoom in or out. Be careful though: Kdenlive can get overwhelmed and will probably become sluggish and unresponsive if you overdo it.
Pros
When you google for masking and creating “windows” in films in Kdenlive, your first result is a tutorial that requires you to create a mask and then copy it to specific directory so that Kdenlive can pick it up as a Luma transition, that is, you are required to play with the underlying configuration of Kdenlive to get what you want. This, I think, is not an elegant solution. Don’t get me wrong: the author did a terrific job figuring out how to hack this problem back in 2011. Fortunately, Kdenlive has moved on and copying files to system directories using sudo is not necessary any more.
With the technique described above, you can create a random number of masks (or at least as many as Kdenlive can handle before crashing) with the tools provided from within Kdenlive.
Cons
One of the problems with this solution is that the “camera” doesn’t follow the “action”. If the players move out of shot, you are left looking at an empty rectangle. You could, of course jiggle the clips around using the Pan and Zoom effect, which is a keyframeable. This means you can set a keyframe, move down the timeline, move the clip somewhere else (framing another character in the window, for example), set that point in the timeline as another keyframe, and Kdenlive will interpolate all the intermediate frames making the panning nice and smooth. However, this is a chore and extremely easy to get wrong.
You can jiggle the movies around by hand using Pan and Zoom to keep the action framed in the windows, but it is a chore.
It would be much more interesting if there were a plugin for an effect that would allow you to select certain things to be followed around. Interestingly, the technology to “follow” a pattern (mostly used for faces) exists within Kdenlive. Check out the Auto Mask, Face Detection and Face Blur effects. They all work in a similar way: by latching on to certain signature shapes within the film and moving a mask with a filter around with them. A similar effect could be used to move the whole clip around to automatically follow, say, a character. I, for one, am putting this on my personal Kdenlive wishlist.
Another problem is that with multiple tracks, masks and transitions, Kdenlive starts to get sluggish quickly. It is impractical to live-preview the project, because replay is choppy, and there is a high chance Kdenlive will crash while editing or rendering. The advice here is to save often!
But the biggest problem I have with this solution is that it is far from intuitive, and it is made even less intuitive by the fact that, as with many other complex GNU/Linux-based applications, the documentation is not up to par.
The cairoaffineblend transition is not even listed in the wiki’s Transitions page and the alphaxor page contains no explanation to speak of, and, of course, no examples. It just redirects the reader to a page belonging to another project that, again, contains no explanation.
I get it: documenting is a boring and an unthankful job, that everybody disparages when it s done wrong, but nobody seems to notice when it is done right. Unfortunately, if an application for an end user is unusable due to the lack of documentation, it is not going to gain any traction within the field it is aimed at.
Conclusion
The more recent version of Kdenlive is a very capable piece of software, marred by the lack of documentation. This is something the developers should address before the app becomes even more complex.
Another thing to remember is that Kdenlive can also be unstable when juggling multiple clips, effects and transitions — as do most MLT-based editors for some reason, so press [Ctrl] + [S] for quick saves often!
Having said that, the new Kdenlive is very feature-rich indeed and I was pleasantly surprised that it allowed me to solve the challenge with the default tools that come with the app, without having to tinker with special settings, edit configuration files, or patching the source code.
I don’t know whether Kdenlive is in the same league as similar, enterprise-grade proprietary editors, mainly because my experience with the latter is limited (if you, dear reader, have more insight on the matter, please share in the comments), but I do know that the latest versions Kdenlive have pushed the limits of what you are able to achieve way back with regards to earlier releases.
Next up: The 3 Window Challenge using Natron!
The third instalment is ready: Video editing with Blender: Everything and the kitchen sink.
Cover Image: Facade by Michael Gaida for Pixabay.com
[sharedaddy]


I have a YouTube channel about tech and Linux, and I use KDEnlive for editing (but Natron for compositing). While I find KDEnlive great overall (remember it’s free and open source) it has some problems with stability and performance under heavy load. I think this has more to do with its backend, MLT. I hope to see more development on both software and hopefully in the close future KDEnlive will get a lot better. But as it is, it’s probably the best free (in all means) video editing software available, and I think it’s pretty great.
Great tutorial! I used Kdenlive for a simple project last year and it did the job, but I didn’t expect it to be able to achieve what you did in that.
As you mention, the lack of documentation is a problem, but I think another problem is the naming of the effects: “cairoaffineblend”, seriously?! Of course, from a technical point of view, it makes sense: Cairo is the engine used, affine is the mathematical method used and blend is the actual effect on the videos. But people who edit videos are not necessarily computer engineers or mathematicians…
Anyway, don’t get me wrong: I think Kdenlive is a very capable software and I’m very thankful for the team behind it! Developing, maintaining and providing such a big piece of software is a very difficult task that requires a lot of time, so kudos to the team!
Looking forward to your next articles; I’m curious about Natron but I’ve never used it myself.
What version of kdenlive are you using? Are you using the 15.x series?
Yes. 15.12.
Ok, Thanks!
excellent article, glad you persisted! – just wondering if you used “proxy” clips at all? These are low-res versions of the clips that are supposed to improve editing speed… Maybe a way to reduce sluggishness for complex work (?)
Interesting. Is this a feature in Kdenlive? If so, my apologies, I was not aware of it. I will look into it. It would definitely help.
Great article. Seth Kenlon also did an intro to Natron https://opensource.com/life/15/7/getting-started-with-natron although I don’t think it will cover exactly what you are trying to do.
The little-known secret that is CairoAffineWhatever is a pet peeve of mine as well. I think I have a bug open about that one.
Great work on the article though!
Good article series. It would have been much easier to simply put the background on the bottom-most track, put each video on a separate track above, add Composite transitions between all of the tracks with “with track” set to the bottom video track, and apply the “Crop, Scale and Position” effect to each video. That is very intuitive IMHO. Maybe you were too focused on the background actually being in the foreground.
THank you for your advice. Someone pointed out how to do it better and I included his solution in part 2 here:
http://www.ocsmag.com/2016/01/03/the-video-editing-challenge-part-ii-natron/
As for using cropping, that doesn’t work for me, because I wanted the mask to be any old shape, even animated if the need be. Again, in part two there is an example that is more explicit.
My apologies for not being clear.
You’d mentioned you’d like to be able “..to move the whole clip around to automatically follow, say, a character”. I too need exactly this feature, but was unable to figure out a way to do this in Kdenlive. I’ve had to rely on using pan and zoom to move the clip around in order
to follow a person moving, but this is extremely time consuming.
In fact, I couldn’t find this feature in Cyberlink PowerDirector, or in Corel’s VideoStudio Pro 2018. I can only wonder “why”? This is one feature that I would use constantly in Kdenlive.